We've Moved

HEY EVERYBODY, WE'VE MOVED

Our blog had gotten too large, and it was getting to the point where it was difficult to comb through looking for specific posts or information. So we have developed a new blog at SailingVita.ca Come and see whats happening now.

Sunday, October 28, 2012

Nav Station Installed

My last post I ranted about the poor service I got from a West Marine store. Well, I decided to email the company and let them know what happened. Not something I normally do, but I consistently get poor service from that store and I needed to tell somebody. Anyway, I received an email back from the store operations manager. I was surprised to hear from them at all, but he was very apologetic, and insisted that they would look into the matter. Acting on a single complaint would be odd for a company this large, but the gesture was nice. Like I told him, it was too late for me, but perhaps this along with whatever others have written will eventually effect some change.

But on to more important things. I have a new nav station. It's nothing super special. I didn't take pictures during the construction, because really all it is, is some plywood with a laminate top and a couple of fiddles. However, being installed is big for us, one less thing to make.

 I threw together the little support under the lift up portion of the table. It is a far better solution than what was originally there. It provides a surprising amount of sturdiness, and doesn't get in the way at all. I did make a couple of boo boos though. The drop down portion is there to allow the end of the table to hide away when someone is sleeping in the quarter berth. However, I didn't quite compensate enough for the thickness of the fiddle, and the end portion does not hang straight down when the support is swung out of the way. It's easy to fix, I just have to run it through the tablesaw and knock off a 1/4". But still, poor engineering. Also, while mounting I accidentally put two of the screws underneath in the wrong spot and put them up through the laminate. They are tiny holes, and difficult to even find unless you know where to look, but it sucked when I looked up and saw them for the first time. Ughhh....
 And below is the hatch pulled out. There will be a storage compartment in behind the set of drawers that are going in, and this will be the access point. It worked out well, but the handle was a pain to put in.
The only thing that is really bugging me now is the back splash. It is covered with the old laminate, and I don't really want to put new laminate on it. I think I will probably slide in a piece of 1/4" ply and stain it up with a couple of coats of cetol. However, I think Serena will get the last say on that one.
I also permanently screwed in the slide down panel from the other side of the wall. I'll have to plug the holes later. Having the panels down, makes for better airflow, and makes the boat seem bigger, but it cuts down on privacy, so tomato/tomatoe, to each their own.

And lastly, I picked up some $7 led 12V replacement bulbs at Princess Auto on Thursday. They weren't an exact match for the bulbs in the boat, but they were the same socket. After some testing I found out that they were reverse polarity to the existing ones, so when I rewire everything I'll just change that and have inexpensive low power lighting. That takes care of three of the interior lights. The other three are different and I have had no luck locating cheap replacements yet.

They are calling for 7 days of rain here, so I will be in the shop for the week. Hopefully I'll get some cabinetry done, ready for install next weekend.

Cheers, and fair winds.

Friday, October 26, 2012

West Marine Kaput....

The one nice thing about writing a blog, is that I get to rant about things that bug me. Well, today its West Marine, but not the company itself, just one store in particular. Every time I walk in there I get the feeling that I am expected to steal something, and most of the time I end up feeling so uncomfortable that I just leave. You wonder why I would even go in there, but they have boat stuff, nuff said. Anyway, yesterday after getting the, if you need anything, just ask speech, (which never makes me uncomfortable anywhere else), I approached the manager about a thru hull step wrench. Pretty simple request, they had a bunch of thru hulls and seacocks on the shelf, having the wrench to install and removed them seemed logical to me. One of the other employees, a man, got involved when I was trying to explain to the manager what it was, and he spent a few minutes trying to explain to me that the thru hull is put on with a nut and the seacock is screwed onto that. I tried to tell him that he was incorrect, and that the seacock was bolted to the hull, and then the thru hull is screwed in from the outside, but the concept didn't seem to make sense to him, he got mad at me and walked away. The manager then tried to tell me that that is how "they" did it on her boat, and I explained to her that no, if they used the nut on the thru hull then "they" put on a ball valve, which really is the wrong way to do it. Eventually the manager looked it up on the computer and found the item, not in stock. However, it was more expensive than Marine Outfitters. Not that it matters, after getting treated like that, there wasn't a chance in hot pucky land that I was going to buy it from them, further more, I don't imagine I will ever set foot in that particular store again. I feel better now. In contrast, I have dealt with the West Marine in Scarborough, Ontario, and the manager and staff are top notch.

Anyway, I spent another $1600.00 yesterday on electrical connectors, grab bars, seacocks, thru hulls, epoxy, and misc other boat stuff. This boat will be brand new and bullet proof by the time I'm done. If I don't keep it for 20 years, someone is going to get a nice cruiser when I sell it. So that's now a total of just over $56,000.00 on a 30k boat(if I'm lucky). It will be over $60k by the time we leave to go south. Doesn't sound so simple anymore, does it. Then on top of that, if cruising becomes a way of life, there will likely be a watermaker added, a new autopilot, a wind vane, and lord only knows how much more stuff. I'll end up like my buddy Jack, $100k in a 30k boat. And to think, someone got upset with me once because I said that a boat was a hole in the water you throw money into.

I did manage to get the top on the nav table, and the fiddles around it. I'll install it today and take a picture. I have never used contact cement to attach a laminate before, so that was kind of fun. I used a flush trim bit in my router to clean up the edges, and sanded the sharp edge off by hand. I just realized how many new things I am doing on the boat. Things that I have never done before. I have a lot of experience doing a lot different things, more than most, and now I am adding to those skills exponentially. I usually joke that I am a jack of all trades, master of none, and now I think that is starting to come true.

I also managed to make myself sick doing the laminate. After playing with the contact cement, then doing some painting, and cetol, there was so much fumes in the shop that I spent the rest of the day a little dizzy with an upset stomach. I know I am not expecting to live forever, but I should know better than that.

Anyway, the truck is loaded to the top of the cap. Its time to start adding all the nitty gritty stuff to the boat, on the downhill slide to completion. That is still months away, but I am starting to see the light at the end of the tunnel. Plumbing, electrical, fit and finish. There is still a lot of work to do.

Wednesday, October 24, 2012

Galley Bulkheads/Progress Update

Well, there goes two nice days I'll never get back. Its a phenomenon that I have been attempting to define since I retired. If there is no set deadline, its hard to get motivated on those days you just don't want to get out of bed. I guess that is what retirement is really about, making up your own schedule. Needless to say, I blew away the last couple of days. Sunday I didn't get much done, Serena came to the boat with me and tried to do some sanding, her heart wasn't into it, the dust bothered her, and the motion of sanding was hard on her aching body parts. So it was a short day. I did manage to winterize the engine and head, plus replace the pump out hose for the black water tank, as well as epoxy in the first two galley bulkheads.

I have been pretty good about not slamming the previous owners so far, and just one in particular, because I don't know which of the three is to blame, but holy crap people, its not that hard to look after a boat. For all the effort that gets put into a shoddy job, it could have been done right in the first place. The pump out hose for the black water tank had a bunch of 4200 wrapped around it where it entered the tank. I wasn't sure if it was an attempted leak fix, or somebody afraid it might leak. Anyway, I wan't to get rid of the stinky original hose and put in some good quality head hose. When I started cutting it off, I found out that the 4200 was covering a thick layer of silicone tape over a completely loose connector. As far as I can tell, the plastic connector, screwed into the plastic tank had started to pull out over the years, because everything was still in good shape, and instead of pulling it apart and putting it back together properly, someone previously just wrapped it and prayed.

I cleaned the connector up, digging all of the sealant out of the threads, put on a good coating of proper PVC to PVC thread sealant, and screwed it back into the tank. It is as strong now as it was when it came from the factory. Better maybe, because it looks like they didn't use anything to seal the joint. But I got the new hose installed and everything seems fine. Perhaps I will find out that the connection is actually flawed, eventually, and I will have to decide whether to replace the tank, or use some really nasty sealant on the connector. I don't like doing that though, because that means that if the connector goes, the tank goes.

Prior to that I spent a day getting the first two bulkheads installed in the galley.
 It was a lot of tinkering to get the bulkheads to fit just right, very time consuming, but it seems to have worked out pretty good so far. I did something a little different with these ones over other panels I have attached to the hull. Because these will be carrying the weight of the stove and fridge compressor, I want some strength at the hull to bulkhead joint. So I put the 1/2 foam along the edge between the bulkhead and hull as before, but this time I epoxied filleted and taped it to the hull with over lapping layers of tape. Then I screwed some stringers to the liner above and screwed the bulkhead to them. What that effectively does is give me the strength at the bottom of the panel, while eliminating the hard point at the hull, and allows some flex where it attaches to the liner. The premise being that everything on a boat will flex to some degree, and if you don't give it a little room, it will eventually make its own. One of the guys at the club told me of a gentleman who gutted and rebuilt a boat on the inside, but when the boat was put into the water all the bulkheads and cabinets let go, because the natural shape of the hull in the water was not the shape the hull took on land. An extreme case perhaps, but even though Bayfields are built like tanks, they are not immune to these effects. In fact I noticed the door to the head does not close well when the boat is on the cradle, but works great when its in the water.
Also notice that there is a space behind the bulkheads where the plywood does not go to the hull. There are a couple reasons for this, but mainly it is to provide a plenum along the hull to allow the fridge compressor unit to draw air from the cabin for cooling. The vent will go into the galley above and behind the fridge doors. This space is extremely hard to access, and provides a good place to run the propane and refrigerant lines.

There is one more bulkhead to go in between these two, to support the other side of the stove. It leaves a small 5" wide cabinet space at the aft end of the galley which will be pretty much useless, but we'll fill it with something, I've no doubt. Next will be to frame out the galley, add the final bulkhead, then build a face frame and doors. Most of that is cold weather work in the workshop.
 I also took the opportunity during a warm day last week to get the new foredeck glassed in. I ground out the gelcoat around the original anchor locker, and used some long hair bondo to set the new hatch into. I will tape and glass the rest of it in later, sand it all smooth, and gelcoat it again. I think it is going to work good. I have decided to use cloth and epoxy inside of the locker to add strength to the whole assembly, and then paint the inside. However those are intentions, and lord only knows what I will end up doing. I was hoping to get this part done before winter, but I don't think the weather gods and I are on good terms.
That's all. Tomorrow we are back to Kingston to pick up more parts, Friday I have to sew up a buddies winter cover, Saturday is a work party at the club, and then the weather god plans to rain on us for 5 days. So shop work. I need to get some of that done. I can install the cabinets in pretty cold weather, so hopefully I will be able to talk myself into doing that this winter, regardless of the temperature.

Cheers.

Thursday, October 18, 2012

Building a Proper Marine Refrigerator and Freezer

Just kidding, what did you think I knew about refrigeration? I'll tell you what I do know, marine fridges are expensive, and they use a lot of power, which is expensive, they take up an incredible amount of space, and you can't put much in them, did I mention they were expensive!

I was going to wait until it was installed and working, but there are so many photos that I though I would update the progress, then do a part 18 later on down the road.

Back in April I made some posts that had the beginnings of the fridge, April 15 being the big one. Since then the project has changed so many times that I can't even remember why all the changes happened. One thing I noticed in that original post was that I intended to gelcoat the inside of the box over an epoxy layup. Back then I believed that that was possible, and now I know that theoretically it works, but in practice its better to paint epoxy. Some of the theory from that post is still valid, no matter how many times it re-engineered itself in my head. So the following is more or less a chronological update.

This was the original box. Designed to give me 4 1/2" of insulation all around and to make maximum use of the space available in the boat. Made from 1/4" plywood, and at this stage it only had thickened epoxy fillets in the inside corners.
Then the entire inside of the box got cover in a layer of glass and epoxy after I epoxy taped the corners.
Then I used thickened epoxy to smooth out all of the rough spots.
Then I cut the bottom off of the box and made it flat across the bottom. Although the original design would fit in the space, and it was maximized to utilize that space, Serena noted that no one was ever going to be able to get at anything in the very bottom of the box. That's when I remembered that humans have a limited reach,  and modified the box accordingly. Unfortunately that means I also lost cold beer room. Ughhh. That will be where her cold beer goes, in theory at least.
The lids. In an effort to keep the box from being too deep, for reasons mentioned above, I only used 3" of insulation in the lids instead of the intended 4 1/2". Also, because of the limited access, and the weight of the lid, I decided to split it in two. The primary lid over the fridge, and the secondary lid over the freezer. The lids interlock and allow for a double seal between one another, just like the fridge box, which I'll show further down. The lids have 3/4" plywood on the top to match the counter height, 1/2" plywood on the sides, and 1/2" on the bottom. Pretty tough for fridge lids, but the theory is that a little weight will help the lids seal better.


The two lids all put together, seams, holes, screws, all filled with thickened epoxy and sanded smooth.
And here is the build of the box interior. There are two sealing lips, one down low and one on the top to help prevent air flow. I put a plexiglass divider between the fridge and freezer. I want to have the freezer cold enough to make ice cubes, but not freeze the beer next door. Theoretically the Nova Kool RT6 unit that I bought is designed to do that, but in a box so small, I was worried that the unit may think I intended to use the whole space as freezer and ruin good beer, so I added the divider, and have enough space that I could insulate the freezer side with 1/2" of foiled insulation. Alternately I could cut holes in the bottom of the plexiglass to allow more cold air to flow if that was required. And just in case, I can remove the divider, if that's what I need to do to make the fridge work the way I want it. However, the secondary excuse for the divider is to hold the slider for the sliding/removable crisper. For putting food in, or something silly like that.

I didn't take any pictures of the painting process, because it was kind of like watching paint dry. But I used Iinterlux's Perfection two part polyurethane. This stuff is nasty. The smell alone will strip paint, it is thin and does not respond well to the brush, or to being put on a vertical surface. But, it you can manage to get enough coats on to cover up the substrate, then you get a finish that is as good as rolled steel. Its impressive stuff, but I will use if very sparingly in the future, just because of how hard it is to work with.

Also here you can see I cut the pieces of insulation at home before going to the boat. The box barely fit down the companionway, so all 16 of the insulation panels had to be glued and tape onto the box while it was in the boat.
The first couple of layers. There is not a lot of space to work with when dealing with something this size in a boat this size. I used PL300 Foam Panel adhesive. I am not really sure how well that is going to hold, but the panels are taped on with tuck tape, and all the seams are taped up as well. I used the PL300 because I didn't want any chance of the glue eating the foam, but also because it has little to no smell. And the tuck tape, designed for house vapor barriers keeps the airflow in check, plus the stuff just doesn't come off. It states right on the roll that this tape is permanent, and it means it. I had some on my garage floor, and I have tried everything short of a sand blaster to get it off, and its still there.
All put together. Jigsaw puzzle, yes, but I numbered the pieces which took some of the guess work out of it.
And here it is mocked up in place. It takes the whole corner of the gallery, with just enough room for the sink on one side and the stove on the other. Also notice I raised the counter top 4" from the original. I don't know what sadist decided that boat counters should be so low, but the way it was, it was a back breaker for anyone over 5' tall.

I may or may not have mentioned it in an earlier post, but somewhere along the way I decided that I had to have 6" of insulation all the way around, or four layers of 1 1/2 code board. However, I ran out of code board after doing only three layers, plus one extra layer on the side where the stove is. I figured that I would try that first, and if there was room left, I would consider buying another sheet. Good call, because there wasn't a 1/4" to spare with the 3 layers. I even had to trim the insulation at the hull and where some plumbing went through. That means there are some weak points in my design, but it'll have to do. On average the box is probably encapsulated with 4 1/2" of insulation, which gives me R27. I could foam in the back, but I think there would be little benefit.

According to the manufacture, with 4" of insulation, I should be able to have fridge of 14 cu.ft., a freezer of 7 cu.ft, or a combo (fridge 8 cu.ft. and freezer 4 cu.ft, at 32 deg C.

Well, I have slightly more insulation, but to err on the side of amateur installation, we'll call it 4", however my entire box is only 2.52 cu.ft.. .6 for the freezer, probably .3 for unusable space, leaving about 1.62 for the fridge. So that's 45L for the fridge, or 63L of total usable space. Compare that to the cooler in your garage and you'll probably notice your cooler is bigger. But I don't have to put ice in there, I hope.

Someone in my yacht club told me that you can't make ice in the tropics on a small boat. Well, I'm sure as hell am going to try.

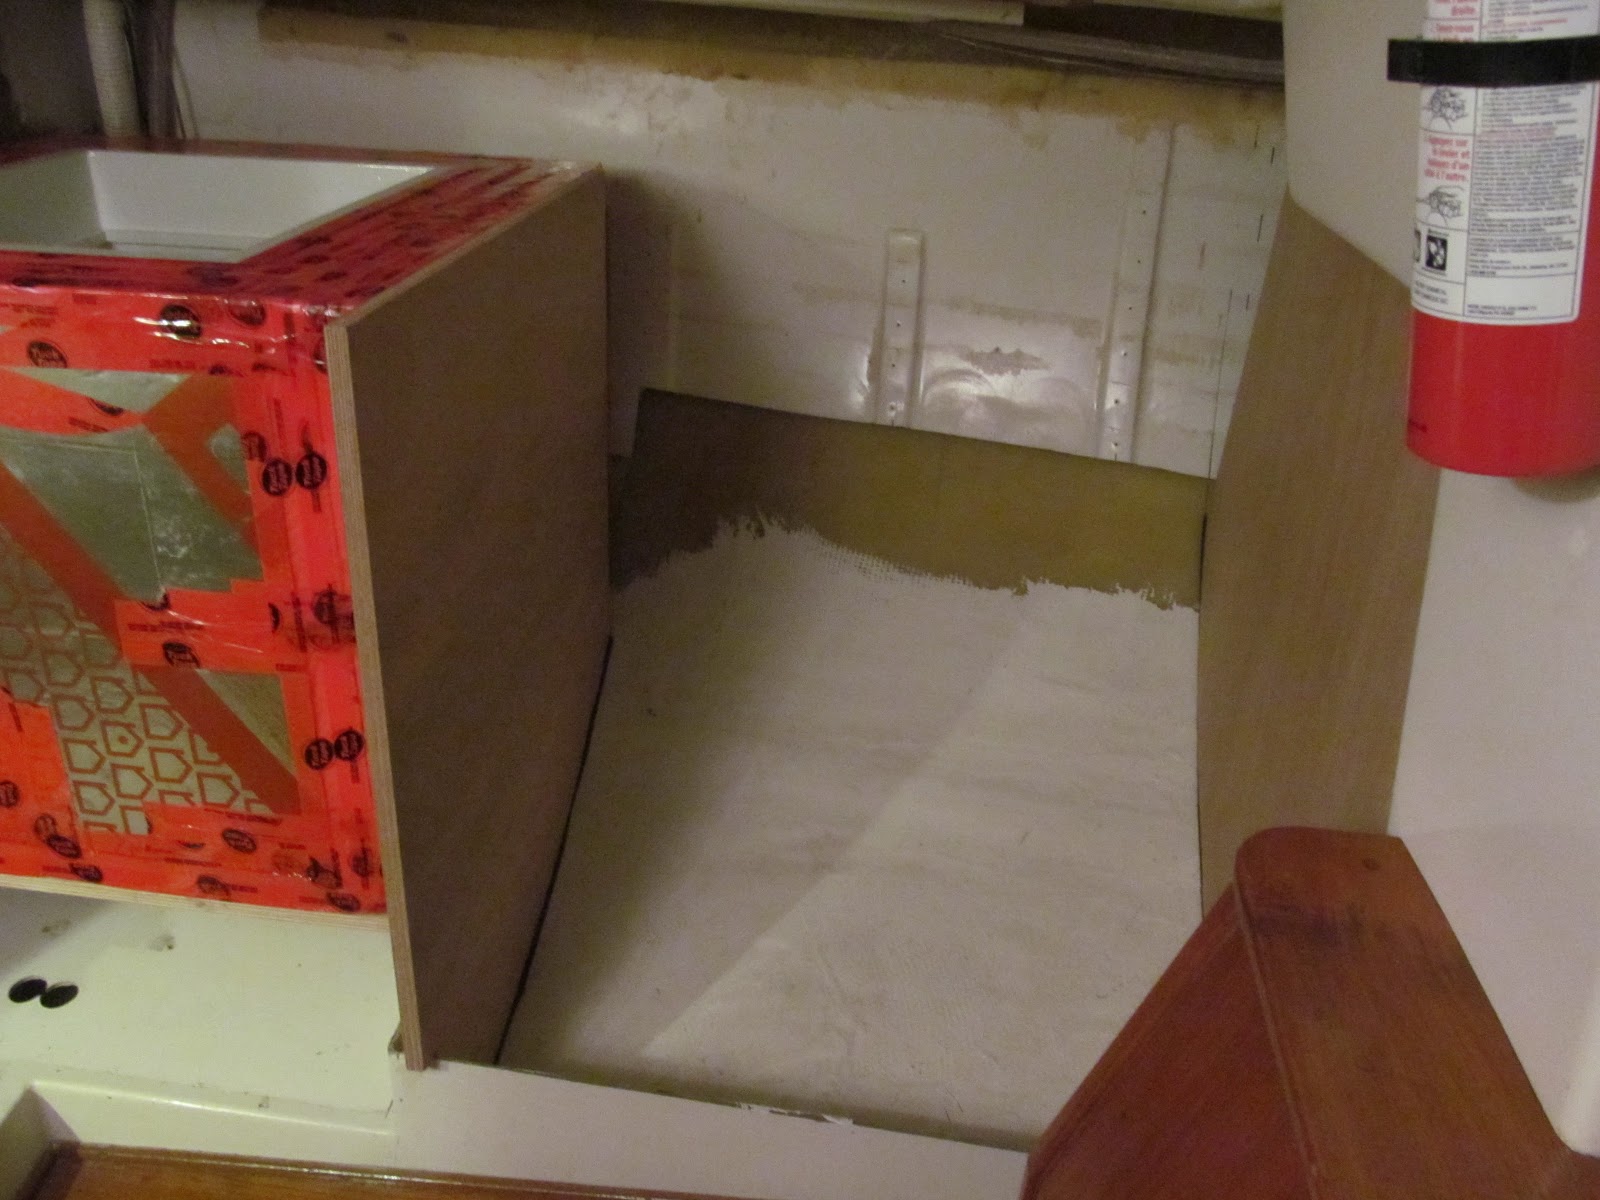
I built a plywood base for the fridge. There will be bulkheads all around to hold everything in place. Notice the little gap between the front edge of the plywood and the corner of the liner. I poured some water down there, and sure enough, right into the bilge. So this is how water that manages to get into aft starboard quarter, makes it too the bilge. Important to leave that open. Also, its hard to tell, but as before I put a layer of 1/2" foam between the plywood edge and the hull. This piece will not be glassed in, but the bulkhead on the aft side of it will hold the stove, and that will be. Still, I want to make sure there is some room for the hull to flex if it needs to. Hard spots are apparently bad.
And the fridge is in place.
I couldn't go any further because I forgot the drawings for the galley at home, or so I thought. On the way home I realized that they were in the passenger seat beside me.

I was tired....

Sunday, October 14, 2012

A Bayfield Day in Bayfield

My one set of parents live just south of Grand Bend, Ontario. Where they run a camp ground. Anyway, we hooked up our travel trailer and headed out to visit them for a few days before the campground closed, and before we winterized the camper. It was cold, and rainy and windy as hell for the whole 5 days. On day two Serena and I took a little drive and ended up in Clinton, home of the Bayfield, and then Goderich, home of the new Gozzard Yachts. It was kind of nice seeing the area where Vita was born. If I had known that we were going to end up there, I would have looked up some addresses. As it was, we didn't even see Gozzard, and although we probably drove right past where the Bayfields were built, I didn't know it.

It was early afternoon, and we were starting to get a bit famished, but wouldn't settle for anything short of a good fish and chip dinner, with a pint of nature's finest ale to knock her down with. We tooled around Goderich, a neat town. But decided to head down Hwy 21 toward Grand Bend, maybe finding a place along the way.

Enter Bayfield. What an absolutely beautiful town. I wish I had taken pictures, but it was blowing about 20 knots, damp, and cold as hell. I stopped into the harbor area, and there was a small chandlery(candy store). Their prices were really good in comparison to what I usually pay, unfortunately I had just finished an order with Pride, and my candy list was currently satisfied. However, I did take the opportunity to ask if there was a good fish and chip place around that served draft, and luckily there was one at the top of the hill overlooking the marina called The Docks. The dinner was great, but the whole area was awesome. Nice beach, nice marina, great facilities. There were at least 4 Bayfields for sale, including a really sharp looking 25, 2-29s, and if I am not mistaken, a 40' Bayfield Ketch. It was under a wrap, but I am pretty sure that's what it was. There were even more Bayfields that weren't for sale, 2-36s, a couple of 25s, at least. It was just a nice place to be.

A word about the title. In our yacht club there are 6 Bayfields, 5-29s and a 32. If fact, I don't think any other manufacturer is as well represented. So there are lots of comments made in general about the Bayfields, all good of course, and the one that always stands out is when the wind pipes up into the 20+ knot range. Down at the club we affectionately call those days, Bayfield days. Because its under those conditions that the Bayfields shine, and the rest of the boats tuck tail and head for home.

So the irony of the fact that we were the proud owners of a Bayfield, having dinner in Bayfield, on a Bayfield day made me chuckle a little. Unfortunately the waitress, obviously not a sailor, didn't quite see the humor in the situation. But hey, us Bayfield sailors tend to be a bit strange anyway.

Monday, October 8, 2012

Fabricating Cockpit Locker Lids

Why do I always seem to pick the most time consuming projects. In hind sight, would it not have been better to leave the cockpit alone, live with the shortcomings, mount my propane tanks on the pushpit, and same myself the time and expense. Of course it would, but I am not smart enough to leave well enough alone. I have to try and fix those little things that bug me.

The helm seat was uncomfortable. The propane bottles hanging off of the stern break down faster, and I have enough stuff back there without trying to fit more. Plus I like the idea of having those tanks in lockers. And that is why I cut out the rear deck of the cockpit, raised the seat 5" or so, and put in dedicated propane lockers.

Of course that meant I had to make lids for the new lockers. I have worked with fiberglass before, and on this boat, but I had never created fiberglass items using a mold. Thanks to all the people on YouTube who showed me how to do it.
 Firstly I measured the cockpit locker top and determined how big I needed the locker lids. Then I built the molds above out of melamine coated MDF. For the curved section of the center hatch I just used a cheap piece of mahogany underlay plywood. Then I used a bondo fillet in the corners to round them out. The can of mold magic, (carnauba wax) said to put 4-5 coats of wax on the mold, the internet said to put 8-10. I put 10, and maybe should have put more, however the molds did come off without too much fuss. Put the wax on, wait 20 mins, polish the dried wax. Do that 10 times, ughhh. And for some reason I didn't take a picture of the gelcoat. I ended up putting 3 coats of gelcoat on with a brush. It took a long time to set up, so it was about 2 days just to get that done. It wasn't too hard to get the colors right. I had my local Home Hardware figure out which colors of dye I needed to use to get the color I wanted, and then I just experimented with the quantities. Is it perfect, no way, but it isn't too bad.
 So then last night after dinner I laid the fiberglass. I had cut all the fabric to fit prior to starting. 2 layers of 8 oz cloth and 2 layers of really heavy woven mat that is sewn together, for every surface. I wasn't sure if it would be enough, but figured I could always add to it later if absolutely necessary. I mixed about 10 batches of polyester resin, using up almost a full gallon before I got it all done. I didn't give the glass any time to setup before I was into the next layer. Also, as you can tell in the picture, I added a piece of 1/4" plywood to the center portion to stiffen the top a little, and create a little groove around the outside where the lip of the locker will sit. Hopefully it will provide a better fit.
And here is one of the lids broken out of the mold. It turned out pretty good. I'll give the whole thing a lite sanding with 600 grit wet dry sand paper, but there are a couple of touch-ups to do on the corners first. I used automotive bondo to fillet the corners. In hind sight I probably should have used modeling clay. The bondo didn't come off as cleanly as I would like, or the wax wasn't as effective in the corners. Not that it matters now though. The blemishes are so small that it makes little difference.
In a rush to find out how it worked out, I broke the lid out of the mold before trimming it. I won't do that with the next two. I'll trim them first, using the mold as a guide. In fact I may put the mold for this one back together for that purpose.

Of course the real test will be when I install them. Cross fingers, knock on wood, pray to God of choice......

Saturday, October 6, 2012

New Waterline Part 2

The new waterline is struck, and the first coat of pretty red paint is on the boot stripe. Perfect, no, but good enough for the people I sleep with, I hope!

 So, recap. Four coats of Interlux Interprotect 2000 to keep the water out, and one coat of Micron Extra. I went with the Extra because we are heading south, and the Micron CSC needs a little boost in warm salt water. But here she is, with the new waterline. I only put 1 coat of bottom paint over the epoxy, I'll give the whole hull 2 coats in the spring. It was supposed to be this month, but I just found out yesterday that my seacocks are on back order for a month. Luckily I have enough of them to go ahead and make the plywood backing plates, and get them epoxied into the hull.
And, the first coat of red on the boot stripe. I shrunk the width to 2 3/4" from 3", but I can't tell the difference. However, it kept the red well below the transom. The line isn't as straight as I would like it, but the top ones aren't either, so now they match. Who can tell from this distance?

That's been my life for two days. The next couple I will spend in the shop. I had brought home my temporary cockpit lids to check that the fibreglass molds I built were the right size, and they were perfect, phewwwwww. So I would like to finish waxing them and get them laid up. Maybe get the upper cabinets made.

I took off one of the old staysail winches to check the new Harken 16STs. Perfect, they fit absolutely perfect. So now all I need to do is cut new backing plates, drill new holes, fill 4 of the 5 old holes, refinish the wood and install. Sweet.

Work to do, cheers.


Wednesday, October 3, 2012

New Winches

Yes I am made of money, I grow it in my back yard.... Ugghhh....

Today we went down to Kingston to my favorite chandlery, Pride Marine, which is no longer Pride, but Marine Outfitters. And if I say it enough I'll get used to the name, but I am going to be a slow convert. It was for good reason they changed their name though.

Anyway, goal, buy seacocks and thru hulls to replace all of the holes below the waterline. Resin, odds and sods. Well, we had to order all of the seacocks and thru hulls, and a few other things. We did however end up coming home with 2 new self-tailing winches. I checked the shopping list, but couldn't find them anywhere.

I had wanted a set of STs for the cockpit, but they are expensive, and the bases seem to be much larger than the Lewmar 7s that came with the boat. In other words they didn't fit. Also, I wanted a set of Lewmar 7s on the mast for halyards. I asked about the 7s, and they don't stock them because they can get them overnight when they order, okay, for future reference. Then I noticed these cute little ST winches on the shelf, they looked about the right size. After some research we found they have twice the power of the Lewmar 7's and the mounting holes are almost identical. And just to make the whole deal sweeter, they are discontinued, these are the last two, and on "clearance", my favorite word.

So, I introduce you to Vita's new staysail sheet winches. Harken Classic 16STs. $429 ea, plus Harper's cut. Not bad considering the same equivalent from Lewmar is $600 clams.


Can't wait to get them installed and play with them.

So, now that I don't get my seacocks until the 25 Oct, I guess I will be doing things in a slightly different order. Tommorrow finish the epoxy and a coat of bottom paint on the old boot stripe. Then onto the new boot stripe. Plus whatever else I find the time to do.

Later

Tuesday, October 2, 2012

The Sea Cock Debacle

Not much will sink a boat faster then a 1 1/2" hole opening up below the waterline where a shut-off valve used to be!

Vita came with gate valves. In 1983 when she was built, it wasn't just the standard of the time, but it was pretty much the only thing available. Not a good idea, but hind sight being what it is. I have been debating whether or not to replace these for a long time. I know the experts say that there is no place on a boat for a gate valve, and I find it hard to believe that they are all wrong. However, they have been on the boat for 30 years, they still work just as good as the day they were installed, and they look pretty heavy duty. Plus, replacements will work out to be an additional $700 clams, and this refit is already pushing the pocket book.

So today after I put the first coat of epoxy on the old boat stripe, I took a good look at the seacocks. Again, they seem solid, they all work, what am I not understanding. So I went to the books, Dan Spurr, Nigel Calder, and Don Casey. If ever there was a more knowledgeable group. They all said the same thing, get rid of them before you regret it. Ughhh... No support from the experts.

So at it I went. The first 1 1/2" seacock for the galley sink drain. When it turned, the thru hull turned, and turned easier than I was comfortable with. I tried everything, and there was no way that gate valve was coming off the thru hull. Sawzall to the rescue. So either the gate valve has corroded and fused together with the thru hull, or they used bedding compound to seal the two together. Neither is a good thing. 

 You can see by the picture that I cut the thru hull. That means I had access to it, and that is a problem. It causes a week point between the hull and the valve. Proper seacocks are attached to the hull, no weak spot.
 Not much support here, just a plywood washer.
 This is what it looked like before I ripped it out. This is the one in the head, as the before picture only turns out if I take it. What is up with the remembering to take the picture thingy.... Must be a missing gene.
 Below is the intake for the head. This one always made me a bit nervous, because it just didn't seem very strong. The last owner had replaced the broken gate valve with this ball valve. When I removed it I found that there was a 3/4" piece of thru hull being supported by bedding compound wrapped around it. This could have snapped at anytime. A little too much pressure on the handle, and in would come the water. Luckily its only a 1/2" hole. This one I am glad is removed.
 And here is the support for the engine cooling water intake. A round piece of rotted plywood with a thru hull nut working its way through it. Another bad one. And to top it off, the elbow and tube attached to the top were copper. How long in salt water before that would have broken down.
 All I can say is that I am glad that we changing them all. I will sleep better off watch in the middle of the ocean knowing that my valves are not going to explode.

And of course, the purpose of the trip to the boat today, two coats of Interlux 2000. Two more to go, and then bottom paint.

Replace the seacocks.

Two coats of bottom paint over the whole bottom.

Then I can paint the boot stripe back on.

Nothing happens fast on a boat.

New Waterline

The first change that happens after a sailing vessel becomes a cruising vessel, raising the waterline....

Well, Vita is not yet a cruising vessel, but I won't get another chance to move the waterline before I leave, so here goes nothing. I decided to move the waterline up 3" starting at the top of the original boot stripe. I did some quick calculations, and that should give me an additional 1800 lbs carrying capacity before the water gets into the boot stripe. She sat just below her waterline this summer, but the boat was gutted, so we'll call that another 400 lbs. That should be enough. I would rather have bottom paint above the waterline than boot stripe paint below.

 So here she sits. I managed to get her level side to side by knocking out the blocking under the starboard side of the cradle, loosening the bolts that hold the forward cradle sides together, and cranking the port side pads until she was level.

See below my waterline marking tool. Two 3" pieces of wood attached with reversed tape to allow them to slide back and forth. A level and pencil. There is a great Youtube video from Sail magazine, narrated by Walley Moran that shows how its made and used.

 So I taped the top of the existing waterline, in case the old gelcoat waterline got sanded off in the process. Marked and taped the top of the new boot stripe.
 Turns out that gelcoat waterline is pretty thick. I went through it a couple of times though. All I need to do now is retape, since the original stuff got destroyed by the sander, and start with the epoxy.
That's today's job. Plus I am going to make a trip to Pride Marine in Kingston tomorrow, so I need to make sure I am getting everything I need. I am even going to try and pull one of the seacocks. I'd like to find out what kind of shape the thru hulls are in and whether or not I have to replace those as well.

Off to the boat.