Quick note. Its official, the boat is no longer called "the boat", she will from now on be addressed as "Vita", of Belleville, Ontario, Canada. Step one to leaving the country is complete, even if the trip is slightly delayed. I was so worried that the process of registering her was going to be a real pain, and it ended up being quite the opposite. The Transport Canada clerk was excellent. I am tempted to remove the licence number from her bow now, but we'll see. Still working on the house, boat stuff to resume in a month or so.
Cheers.
Friday, December 9, 2011
Friday, November 25, 2011
As the World Turns...
So are the days of our lives...
Just kidding, enough with the soap opera crap right... However, I would argue that most peoples lives are like a soap opera anyway. And so goes my own...
Originally there was a five year plan to purchase a boat, get to know her really well, upgrade her as we used her, and then head off to the wild blue wonder for an indeterminate number of years. Basically until it stopped being fun. Then, as I mentioned before, during an alcohol assisted whim this spring, we decided to leave in Sep 2012 to try it for a year. Good plan I thought. We would leave the house in the capable hands of our teenage son, and off we would go for 10 months to try cruising. It was an aggressive schedule to try and accomplish the refit. But I am never happy unless I am in over my head.
Unfortunately, things change. It scares the crap out of me, because I know that there are a lot of people who continually put off going cruising because of one reason or another, until it is too late. I do not want to be one of those people, however, Sep 2012 is not going to work for a couple of reasons, so sailing to the Bahamas has been put off for another year. I console myself with the fact that we are still well under our original 5 year plan.
So the issues. Most importantly, the stock market has taken a shit kicking, and all the money for the refit is tied up in the market. Only a fool would sell at time like this, and I don't want to be one of them, so I really need the market to come back a bit before I would feel comfortable completing the refit. Second, we are really uncomfortable leaving a $250,000.00 asset in the hands of an 19 year old. Don't get me wrong, he is a good kid, but not yet mature enough to the handle the responsibility of maintaining a house in pristine condition, so that it can be ready for sale when we return. The house is very "dent-able" as Serena puts it, which basically means that a little bit of neglect or damage could have a dramatic effect on the aesthetic value, and subsequently reduce the sale-ability. Read; a lot of soft wood; floors, ceiling, trim, stairs, railings, etc...
So we have decided to sell the house before we leave and put everything in storage. Unfortunately because we just received occupancy this summer, we cannot sell until Aug 2012 in order to escape the capital gains tax on the sale of the house. The agony... Plus, Aug is a bad time to sell a house, at least around here. The Spring is a much better time, so we'll list it Mar 2013.
That doesn't change the blog much. I will still be doing the refit, and we will still be traveling, it might just take a little longer, and there won't be an arrival in Nassau for an additional year.
By the way. I got an email from Transport Canada. It looks like the boat's new name will be "Vita" out of the Port of Belleville, Ontario, Canada. Vita, pronounced (Veeta), is Italian for "Life". They still need some pictures and a declaration from us, but it looks good. Can't wait.
The basement is coming together nicely, so hopefully I will be back to boat stuff very soon.
Until next time.
Friday, November 11, 2011
Winter has Come
At least it has for me. There is no snow on the ground yet, but the boat tarp is closed up for the season. I didn't get half of the things done I had envisioned, and now I have to finish the basement before Xmas. We have 14 people coming for the holidays, and we currently have a 2 bedroom house. Priorities. There probably won't be many posts between now and January when I start sewing. Then the spring time will be a flurry of activity.
Dreaming of sailing.
Rob
Dreaming of sailing.
Rob
Thursday, November 3, 2011
Caveat Emptor
Maybe not the appropriate title, since I had a pretty good idea what I was getting into when I bought the boat. I had a survey done, even if it wasn't worth the paper it was written on, but it did highlight some areas of concern, and I saved a couple of thousand dollars for my headaches. I am curious if it is too late to get my money back? As a side note, most small boat surveys in Canada now are to appease the insurance companys, and really don't reflect the true condition of the boat all that much, but we have to have them to get insurance, and we have to have insurance to get a slip at almost all clubs/marinas. Ironically, it has become a process for the sake of the process.
I had forgotten how much fun it was to renovate. Several years ago, with our first home, we got ambitious and embarked on a 4 year refit/renovation of our new to us, house. We made about $35K for our efforts, during the resale, but it cost me a lot of aches, cuts, bruises, and a chronic back problem. In an ironic twist with this boat, I am ending up with the same broken parts only in the end I am sure that I will be giving up that $35K, because the boat won't be worth any more than I paid for it. Funny thing about boats and boating, we will always end up in the financial dumpster with a boat, giving light to the phrase, "a boat is a hole in the water that you throw money into". However, as every boater knows, the priceless experience of being on the water can never be measured with coins.
Spent a few hours working on the boat yesterday. I tried to get the prop off, but my puller was a little too short, so I guess I'll have to get another one, or modify the one I have with longer arms. Then it was on to gutting and tearing apart.
I cut out the bottom of the starboard cockpit locker, which was just a shallow tray. Under it was a quarter berth, that will provide a lot of space for a new cockpit locker, starting battery, and the condensing unit for the refrigerator. It went well, a few cuts and bruises, including pinching my finger in the lid, its a pretty black colour today. I will have to grind down the edges, and fibreglass a couple of spots before painting, but that is a long way off. The fibreglass was a solid 1/4" thick, not bad for a shallow locker.
Before the saws-all.


The real fun though came when ripping out the fibreglass in the starboard cockpit cubby. During the survey it had been noted that this area had water in it, and there were some noticeable slices in the fibreglass. Turns out there was lots of water, in fact the plywood was completely saturated, and had become delaminated from the fibreglass. Luckily it is only a small strip, and does not have any effect on structural integrity. I will let it dry out over the winter, even drilling a couple of holes in the bottom, and then re-epoxy in the spring.
Before


I also removed the batteries, and tried to figure out how the new batteries will fit. Bad news is that I am going to lose the second quarter berth to battery storage. So I will have to modified that side too. It is amazing how much space 4 golf cart batteries take up. So, I guess if anyone comes to visit, they will have to go home at bed time, or sleep in the cockpit.
I leave you with a couple of pictures of the cockpit. Destruction is always so messy. I did clean it up before I left though. I probably wouldn't have gotten out of the boat if I hadn't. Now I have to wait a few days before I can get any more work done. I have company coming, and truth is, I need the break.


I had forgotten how much fun it was to renovate. Several years ago, with our first home, we got ambitious and embarked on a 4 year refit/renovation of our new to us, house. We made about $35K for our efforts, during the resale, but it cost me a lot of aches, cuts, bruises, and a chronic back problem. In an ironic twist with this boat, I am ending up with the same broken parts only in the end I am sure that I will be giving up that $35K, because the boat won't be worth any more than I paid for it. Funny thing about boats and boating, we will always end up in the financial dumpster with a boat, giving light to the phrase, "a boat is a hole in the water that you throw money into". However, as every boater knows, the priceless experience of being on the water can never be measured with coins.
Spent a few hours working on the boat yesterday. I tried to get the prop off, but my puller was a little too short, so I guess I'll have to get another one, or modify the one I have with longer arms. Then it was on to gutting and tearing apart.
I cut out the bottom of the starboard cockpit locker, which was just a shallow tray. Under it was a quarter berth, that will provide a lot of space for a new cockpit locker, starting battery, and the condensing unit for the refrigerator. It went well, a few cuts and bruises, including pinching my finger in the lid, its a pretty black colour today. I will have to grind down the edges, and fibreglass a couple of spots before painting, but that is a long way off. The fibreglass was a solid 1/4" thick, not bad for a shallow locker.
Before the saws-all.

After the saws-all.

I still need to cut out the pan below that acted as the quarter berth, but I want to make sure I get that just right when designing the new galley. Which I also started gutting today. I was taking it really easy because I wanted to save all of the teak. I am not sure that I am even going to use teak for the new cabinets, but I would hate to destroy it at the cost it is today.

Before

After

I also removed the batteries, and tried to figure out how the new batteries will fit. Bad news is that I am going to lose the second quarter berth to battery storage. So I will have to modified that side too. It is amazing how much space 4 golf cart batteries take up. So, I guess if anyone comes to visit, they will have to go home at bed time, or sleep in the cockpit.
I leave you with a couple of pictures of the cockpit. Destruction is always so messy. I did clean it up before I left though. I probably wouldn't have gotten out of the boat if I hadn't. Now I have to wait a few days before I can get any more work done. I have company coming, and truth is, I need the break.


Tuesday, November 1, 2011
Elbow Grease
OMG... I hurt. There, my kids will be happy, I used a new millennium word.
Owning a boat is hard on the body. And I am not getting any younger. No offense to the folks over 42. Serena and I spent the better part of 5 hours scrubbing the topsides to get rid of the years of staining on the gelcoat. I eventually had to go out and get a rubbing compound in order to get out the really bad stuff, and to get the last remnants of the old name off of the transom and both port and starboard bows. We had to get her cleaned up as best we could, as we have decided to paint the decorative hull stripes and the boot stripe. They are currently brown, and that color is not available around here without mixing, and using stock colors makes touch-up so much easier. One of the previous owners had painted the stripes around the letters of the name, a cute effect, but a pain now that the name is changing.
So that done, we put all the ground tackle gear on deck to see how it was going to fit. About the best spot I can find for the windlass is right on top of the anchor locker door. So bye bye door. Actually, I am going to cut the door in half, beef up the front half with plywood and epoxy, and leave the back half opening. The trick will be in getting the front half stiff and strong enough to carry the windlass with all the pressures on it. Then I will pipe the main anchor chain down into the cavernous area below the bows, and the secondary anchor rode will stay in the locker at deck level. Sounds kind of ambitious, even to me, but it is the best solution I could come up with.
Also noticed while I was crawling up in the bow that someone previously had cut two holes in the furthest reaches of the bow in order to get access to the bolts holding the bowsprit, presumably, however, I can see light around the holes, so my guess is that they are leaking. Another thing to add to the list. I'll probably have to remove the trail boards to get access, ugggh.
Built a makeshift frame, and got the tarp on. So, worst case scenario, we are ready for the winter. The tarp is full of little holes, but it should be sufficient to keep most of the moisture out. I may yet buy another tarp to put over this one. Just one more for the list. Buying old boats is exactly the same as buying old houses. You never know what you will find, and you always spend extra time and money fixing up someone else's screw ups.
Today we start cutting up things. I once heard a guy say that the only difference between him and most people when it comes to refitting, is that he wasn't afraid to take a saws-all to a boat. And although I am not really afraid, and am always a little concerned when ripping something apart, because it can never go back to the way it was. Of course, if it was okay the way it was, I wouldn't be changing it, right.
Until next time.
Rob
Friday, October 28, 2011
Sails
When is rains, it pours. I have been saving up for a week or so, now I get to pour out the posts. I will try to keep this one short, but a discussion about sails on a sailboat, could run into years, novels, and libraries.
Our last boat was a Hughes H25. A beautiful little sailing boat. It took no time to get up and moving in a breeze, tack on a dime, and forgive you for every mistake that novice sailors make. (read: putting the spreaders in the water, on a day so windy, even God would stay in port). However, as with old sailors, goes old sails, and ours were over the hill. Not wanting to spend a whole bunch of money on them, I took the sails home one winter to refurbish them. I had read Emiliano Marino's book, The Sailmaker's Apprentice, and was convinced that a battenless, roachless main would be best for us. We were not racers, we were cruisers, and as such did not need any fancy sailing apparatus that would give us the "edge". I recut the mainsail, giving it a roach-ectomy, added two reefs, and a reef to the 100% jib, so that I could shorten the rig down to little scraps, and keep the spreaders out of the water on really windy days. Ironically, the boat performed exactly the same as it did before, perhaps just a tad better, and it got rid of the excessive weather helm that tends to plague those little boats.
My point is, that as a cruiser, it is better to look for the simple solutions. Most people I talk to now, have full batten mainsails. In fact, our boat has one too. Why anyone would go to the trouble of putting a $3000.00 racing sail on a cruising boat, that would be just as happy with a $1700.00 sail, is beyond me. I have had battens, and I have been battenless, and I choose battenless anytime. Without battens, you can put the mainsail up in just about any wind short of a gale, in any direction. Where as with a battened main, you have to be pointed into the wind. That alone is a huge advantage. Plus, a main without battens will need a lot less maintenance, as nothing will eat away at the cloth, like a fibreglass stick.
Now, as I mentioned above, we have a full batten mainsail. It is not in bad shape, but we are going cruising, and that sail will need to perform a lot more than it has in the past. I would prefer something a little stronger and a little more bullet proof. Also, the staysail is original to the boat, which makes it 28 years old. That is too long for any sail to be asked to perform. Luckily though, the previous owner had just bought a new yankee for the furler in 2009, and it is in great shape. So, I need two new sails, at about $1700.00 per, plus taxes. Anyone have $3500.00 I can borrow. Just kidding. The answer was Sailrite. A great company, providing sewing supplies and kits for sailors, and some of them smoker types too. I am not affiliated with the company, and they don't have any public stock offerings, but I would work there in a heart beat if I could. The 16 hour commute, one way, would kill me. Their closest outlet to me is in Indiana.
Sailrite put together a kit for my mainsail, including all the hardware, precut panels for the sails, a kit for my staysail, all the tools, punches, cutters, grommet dies, butane hot knife, and an industrial electric/hand crank sewing machine with all the bells and whistles, for $3000.00. And, included in that price was a bunch of extra supplies to keep me going for years, thread, needles, grommets, etc... All I have to do is put the kits together, which will wait for January, when my workshop will become a sail loft. But, I saved a few pennies, and I damn near have enough stuff to open my own sail repair business.
 The Main sail kit.
 The sewing machine.
Mainsail Features:
7.4 oz Dacron fabric. About as heavy as I can get for a boat this size without getting into plywood. No, but seriously, a heavy built main, needs a heavy fabric. The only problem will be in very light winds, and I may experiment with a nylon main later on.
No headboard. Sail companies use headboards to expedite the sailmaking process, and to add just that little bit extra sail area for a racing advantage.
Hand sewn grommets. The head, tack, clew, and all the reef points have hand sewn grommets. They are much stronger than the machine pressed ones, but they are so time consuming that a sail maker couldn't possibly do it with out a lot of added expense.
3 sets of reef points. I wanted the ability to shorten the main down to a tiny scrap, so that I could ride out a storm if need be. May never see one, but for the extra $30, what the hell. And then I don't have to worry about a storm trysail if I ever find my self further abroad.
Triple stitched seams. Racers will talk about sail stretching, and when that happens, the sail losses shape, and becomes less efficient. So the newer the sails, the less stretch, the better shape, the better the "edge". However, with today's dacron fabrics, there is really no stretch to speak of. The materials are so good, that the manufactures have all but eliminated it. However, the seams, on the other hand have lots of stretch, and the best way to keep that stretch to a minimum is put an extra row of stitching in. Plus, it just makes the sail that much stronger. You'll not likely get tripled stitched seams from a sail maker, unless you ask, and yes, that will cost more.
The staysail is similarly designed, with only two sets of reefs. Same fabric, the theory being that the staysail is mainly used in heavier winds, and once reefed all the way down is the right size for a storm sail.
So here is the reefing schedule for our Bayfield 29. At what wind strength? I don't know yet, that is one of the things we'll have to figure out. But since we don't have an anemometer on board, it doesn't matter much. We'll reef when we think its a good time.
Light winds to Gale
1. Full main, full staysail, full yankee
2. Full main, staysail bagged on deck, full yankee(most normal situation)
3. 1st reef in main, full staysail, yankee furled
4. 2nd reef in main, 1st reef in staysail, yankee furled
5. 3rd reef in main, 2nd reef in staysail, yankee furled
6. Main down, 2nd reef in staysail, yankee furled (Hove to)
7. Pray to the God of your choice.
I also have a brand new reacher that came with the boat, and I am looking forward to playing with it this year when the winds get light. And, I intend to sew up a riding sail for the back stay when at anchor. But that should give us a nice full complement of choices.
I want to relate a little story about the importance of a proper sail wardrobe for a sailboat. Some friends of ours retired and wanted to sail to the Carribean. They purchase a boat that would be big enough for their family, outfitted it, and away they went. The sails were ok, but they had seen better days. On top of that, the boat did not really have a reputation for being a good sailing boat. They took their trip, over 2 years, as far as Grenada, and back to Canada. It was a good trip, but at one point in their story I recall how they had to get a tow from one of the islands back to a major port to get their engine repaired, not once or twice, but on three different occasions. I didn't bother to ask them why their sails were broken, as I figured that might not go over well, but it made me realize that if they had bought a better sailing boat, with a good set of sails, then they could have traveled all over the Carribean and only repaired the engine later when they happened to be in the right place. As a side note, when I looked at the hundreds of photos of their trip, I didn't see one picture where the mainsail was up. The genoa was unfurled occasionally while they were motor sailing. I am not saying there is anything wrong with being a powerboat, but if your going to be a powerboat, don't go sailing.
My rant for the day. Don't get me wrong. I am not trying to tout my way as the only way, it is just an ideal that I prefer. However, what I find in talking to people is that a lot of sailors really don't know that much about sails, let alone which sails would be best for them. Most sailors believe in the natural progression of sail design, but sometimes its the old ideas that work the best. But most importantly, sailboats were meant to be sailed.
Our last boat was a Hughes H25. A beautiful little sailing boat. It took no time to get up and moving in a breeze, tack on a dime, and forgive you for every mistake that novice sailors make. (read: putting the spreaders in the water, on a day so windy, even God would stay in port). However, as with old sailors, goes old sails, and ours were over the hill. Not wanting to spend a whole bunch of money on them, I took the sails home one winter to refurbish them. I had read Emiliano Marino's book, The Sailmaker's Apprentice, and was convinced that a battenless, roachless main would be best for us. We were not racers, we were cruisers, and as such did not need any fancy sailing apparatus that would give us the "edge". I recut the mainsail, giving it a roach-ectomy, added two reefs, and a reef to the 100% jib, so that I could shorten the rig down to little scraps, and keep the spreaders out of the water on really windy days. Ironically, the boat performed exactly the same as it did before, perhaps just a tad better, and it got rid of the excessive weather helm that tends to plague those little boats.
My point is, that as a cruiser, it is better to look for the simple solutions. Most people I talk to now, have full batten mainsails. In fact, our boat has one too. Why anyone would go to the trouble of putting a $3000.00 racing sail on a cruising boat, that would be just as happy with a $1700.00 sail, is beyond me. I have had battens, and I have been battenless, and I choose battenless anytime. Without battens, you can put the mainsail up in just about any wind short of a gale, in any direction. Where as with a battened main, you have to be pointed into the wind. That alone is a huge advantage. Plus, a main without battens will need a lot less maintenance, as nothing will eat away at the cloth, like a fibreglass stick.
Now, as I mentioned above, we have a full batten mainsail. It is not in bad shape, but we are going cruising, and that sail will need to perform a lot more than it has in the past. I would prefer something a little stronger and a little more bullet proof. Also, the staysail is original to the boat, which makes it 28 years old. That is too long for any sail to be asked to perform. Luckily though, the previous owner had just bought a new yankee for the furler in 2009, and it is in great shape. So, I need two new sails, at about $1700.00 per, plus taxes. Anyone have $3500.00 I can borrow. Just kidding. The answer was Sailrite. A great company, providing sewing supplies and kits for sailors, and some of them smoker types too. I am not affiliated with the company, and they don't have any public stock offerings, but I would work there in a heart beat if I could. The 16 hour commute, one way, would kill me. Their closest outlet to me is in Indiana.
Sailrite put together a kit for my mainsail, including all the hardware, precut panels for the sails, a kit for my staysail, all the tools, punches, cutters, grommet dies, butane hot knife, and an industrial electric/hand crank sewing machine with all the bells and whistles, for $3000.00. And, included in that price was a bunch of extra supplies to keep me going for years, thread, needles, grommets, etc... All I have to do is put the kits together, which will wait for January, when my workshop will become a sail loft. But, I saved a few pennies, and I damn near have enough stuff to open my own sail repair business.


Mainsail Features:
7.4 oz Dacron fabric. About as heavy as I can get for a boat this size without getting into plywood. No, but seriously, a heavy built main, needs a heavy fabric. The only problem will be in very light winds, and I may experiment with a nylon main later on.
No headboard. Sail companies use headboards to expedite the sailmaking process, and to add just that little bit extra sail area for a racing advantage.
Hand sewn grommets. The head, tack, clew, and all the reef points have hand sewn grommets. They are much stronger than the machine pressed ones, but they are so time consuming that a sail maker couldn't possibly do it with out a lot of added expense.
3 sets of reef points. I wanted the ability to shorten the main down to a tiny scrap, so that I could ride out a storm if need be. May never see one, but for the extra $30, what the hell. And then I don't have to worry about a storm trysail if I ever find my self further abroad.
Triple stitched seams. Racers will talk about sail stretching, and when that happens, the sail losses shape, and becomes less efficient. So the newer the sails, the less stretch, the better shape, the better the "edge". However, with today's dacron fabrics, there is really no stretch to speak of. The materials are so good, that the manufactures have all but eliminated it. However, the seams, on the other hand have lots of stretch, and the best way to keep that stretch to a minimum is put an extra row of stitching in. Plus, it just makes the sail that much stronger. You'll not likely get tripled stitched seams from a sail maker, unless you ask, and yes, that will cost more.
The staysail is similarly designed, with only two sets of reefs. Same fabric, the theory being that the staysail is mainly used in heavier winds, and once reefed all the way down is the right size for a storm sail.
So here is the reefing schedule for our Bayfield 29. At what wind strength? I don't know yet, that is one of the things we'll have to figure out. But since we don't have an anemometer on board, it doesn't matter much. We'll reef when we think its a good time.
Light winds to Gale
1. Full main, full staysail, full yankee
2. Full main, staysail bagged on deck, full yankee(most normal situation)
3. 1st reef in main, full staysail, yankee furled
4. 2nd reef in main, 1st reef in staysail, yankee furled
5. 3rd reef in main, 2nd reef in staysail, yankee furled
6. Main down, 2nd reef in staysail, yankee furled (Hove to)
7. Pray to the God of your choice.
I also have a brand new reacher that came with the boat, and I am looking forward to playing with it this year when the winds get light. And, I intend to sew up a riding sail for the back stay when at anchor. But that should give us a nice full complement of choices.
I want to relate a little story about the importance of a proper sail wardrobe for a sailboat. Some friends of ours retired and wanted to sail to the Carribean. They purchase a boat that would be big enough for their family, outfitted it, and away they went. The sails were ok, but they had seen better days. On top of that, the boat did not really have a reputation for being a good sailing boat. They took their trip, over 2 years, as far as Grenada, and back to Canada. It was a good trip, but at one point in their story I recall how they had to get a tow from one of the islands back to a major port to get their engine repaired, not once or twice, but on three different occasions. I didn't bother to ask them why their sails were broken, as I figured that might not go over well, but it made me realize that if they had bought a better sailing boat, with a good set of sails, then they could have traveled all over the Carribean and only repaired the engine later when they happened to be in the right place. As a side note, when I looked at the hundreds of photos of their trip, I didn't see one picture where the mainsail was up. The genoa was unfurled occasionally while they were motor sailing. I am not saying there is anything wrong with being a powerboat, but if your going to be a powerboat, don't go sailing.
My rant for the day. Don't get me wrong. I am not trying to tout my way as the only way, it is just an ideal that I prefer. However, what I find in talking to people is that a lot of sailors really don't know that much about sails, let alone which sails would be best for them. Most sailors believe in the natural progression of sail design, but sometimes its the old ideas that work the best. But most importantly, sailboats were meant to be sailed.
Lucky Boom
I wish I knew, and I probably should have asked the Bayfield news group before posting this, (because it might make me look stupid), but I would hate to ruin other peoples image of me, so here goes.
I was cleaning my workshop the other day, and there was a rope hanging off of my boom in the mezzanine that kept smacking me in the head every time I walked by. So I thought it would be a good time to get rid of the rope, since I had no idea what it was there for anyway. I pulled the boom down, started looking it over, and discovered that there are three sets of in-boom reefing lines for the mainsail. How exciting... I wasn't sure, and still am not sure whether that was a common feature for Bayfield boats, but it gives some idea of how the boat is to be used; it's a cruiser. The ironic thing is that the sails only came with 2 sets of reef points, so why there would be 3 available in the boom is beyond me. Luckily, my new sail has 3 sets of reef points; happy me.


The lines that were in the boom were rotted, too short, and looked liked they hadn't been used in many years. How people can neglect the most important part of a sailboat is beyond me, (the sailing rig), but I like to have everything set up, whether I plan to use it or not. Our last boat was the same way, no reefing lines, no way to shorten sail, when we bought it of course. When we sold it, there were 2 reefs in the main, and a reef in the 100% jib.
So, I re-rigged the boom and left about 15' of line on either side so that I can set them up properly when it is installed next spring. Can't wait to try it out.
Winter is Coming
The mad rush. I have been so busy doing things that don't matter, that I have neglected the things that do.
The boat had not yet been winterized, and the weather man was calling for an overnight of -5 deg C. Probably not cold enough to do any damage, but if by some freak chance the weather man was wrong (never happens), and it dipped to -10, then things could be a bit dicey, and I don't relish the thought of spending eight grand on a new engine along with all the other things that are getting done.
So we went down to the boat, or at least tried. Our boat is kept at the Yacht Club on Canadian Forces Base Trenton. Which means for security reasons, we don't always have access. Yesterday for about 4 hours, was a good example. They had found a suspicious package, which turned out to be someone's lunch from what I hear.
I had to be home 45 mins away for 6:00, because I had to come back to the yacht club for a weather course I was enrolled in. So the absolute latest I could get to the boat would be a about 3:00 and still get the engine winterized. Luckily after a three hour wait, we got to the boat, right at 3:00. Having never changed the oil in a boat, or flushed the engine with antifreeze, presented us with no problems. There had been one of those suction type oil extraction devices on board when we bought the boat, and although it wasn't in the best of shape, it seemed to work. The hard part was getting the damn engine started. At +5 deg C, it wasn't cooperating very well. Thank god for lots of battery power. Makes me wonder about cranking amps and cranking reserve, hmmm, going to need some more thought in the matter. Of course, if I had of increased the throttle a little, then maybe it would have been a bit quicker. Oops.
Long story short, managed to get the everything done, and home by 5:15, which means I get a shower before the course. Now the weather man is calling for a nice week ahead. With any luck I will get the galley gutted, the head removed, hull cleaned, settees torn apart, windlass location figured out, remove a small piece of the deck where there has been a crack and some water has infiltrated, remove the lifelines, and cover the boat. Just a short list. I'll have pictures of the galley destruction next week. Hopefully.
Tuesday, October 18, 2011
Cradle Modifications
Unfortunately with a new boat, you just never know how it fits on the cradle, until the crane drops the boat onto it. The cradle that came with the boat was huge. There are 4 other Bayfield 29s in the club, and mine is by far the largest cradle, in fact much larger. Several people asked me the day of lift out how the boat was supposed to fit in it, and comments like, "I don't think its going to fit", made for a little nerve racking first lift out. Luckily the boat fit into it really well, the only problem was that the legs and pads were stuck in one position and weren't adjustable. Which means, there would be no way of removing them to strip, epoxy, and repaint the area under the pads. So unfortunately I had to modify the cradle. The pictures speak for themselves.
I had to weld washers to the top of a pipe that fits into the leg. Do some grinding here and there. Some drilling, new wood blocks, new carpet, etc... $150.00 worth of parts just so the pads can be adjustable. By the way, apparently your not supposed to weld galvanized metal. But having never welded before, I didn't know. I pulled my mig welder out of its box for the first time, quickly read the manual, one page, and welded up a galvanized washer to a 2 1/2" rusted steel pipe. I knew enough to grind the rust and the top coat off of the washer first, but that was it. Do not try this at home. And yes, I have had the welder for months. Another item purchased for a life I didn't have at the time, and looks like I might not have time now, for a long time...
Then the one leg had been crushed a little, and the inside pipe wouldn't come out, so I had to come up with a different way to mount that one. Just a royal pain in the but, and 5 hacksaw blades worn out. Do you have any idea how much metal you have to saw to wear out 5 hacksaw blades. Too much..
Before
After

And now the pads move to get under them. The way they should have been in the first place. Once I get the cradle back to the house next year, I will do a little more work and make it that much better, but it was hard to get it just right with the boat in the way. Hey Herc, could you hold this up for a minute....
I had to weld washers to the top of a pipe that fits into the leg. Do some grinding here and there. Some drilling, new wood blocks, new carpet, etc... $150.00 worth of parts just so the pads can be adjustable. By the way, apparently your not supposed to weld galvanized metal. But having never welded before, I didn't know. I pulled my mig welder out of its box for the first time, quickly read the manual, one page, and welded up a galvanized washer to a 2 1/2" rusted steel pipe. I knew enough to grind the rust and the top coat off of the washer first, but that was it. Do not try this at home. And yes, I have had the welder for months. Another item purchased for a life I didn't have at the time, and looks like I might not have time now, for a long time...
Then the one leg had been crushed a little, and the inside pipe wouldn't come out, so I had to come up with a different way to mount that one. Just a royal pain in the but, and 5 hacksaw blades worn out. Do you have any idea how much metal you have to saw to wear out 5 hacksaw blades. Too much..
Before

After

And now the pads move to get under them. The way they should have been in the first place. Once I get the cradle back to the house next year, I will do a little more work and make it that much better, but it was hard to get it just right with the boat in the way. Hey Herc, could you hold this up for a minute....
The Bottom
I never seem to amaze myself with my ability to do things that my body and mind tell me not to do. Like crawling around under a sailboat scraping and sanding several layers of nasty paint off of the bottom.
We had no choice really, the boat had Interlux's Bottomcoat XXX for antifouling paint, and it won't survive life in the tropics. I emailed the company, and they said so. Lucky for me though, the last owner kinda of neglected the bottom paint a little, and the paint came off relatively easy with a sharp paint scraper and a putty knife. It still took several hours over four days to get it done, but it could have been worse. The guy down the end of the parking lot is grinding his off; apparently it was in better condition than mine. So, after all that scraping, I had the wonderful privilege of spending a further several hours over 3 more days sanding off the last remaining little bits of paint, and I thought scraping sucked, turns out that was the fun part.
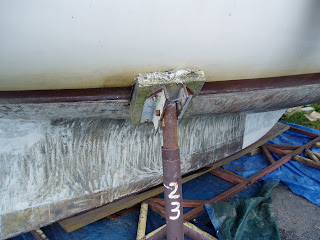
During the process I came across some weird things in the hull, and having never stripped the paint off of a sailboat hull before, I had no idea what I was looking at. The first thing was that there seemed to be 3 layers of gelcoat. A white layer that was very thin, a grey or translucent layer under the white, that was a little thicker, and finally a thick layer that was the same colour as the hull sides. That should have been my clue, however, since I wasn't told that the boat already had an epoxy barrier, I didn't put two and two together. So I let the cat out of the bag, but basically little things added up, and just to make sure, I shanghaied George and asked him his opinion. He agreed, and pointed out the lines on the bottom of the keel that mimic the shipping cradle, which I had never seen, until now of course. There is another Bayfield down the parking lot that has the original cradle, and then it all made sense.
So, that's great news. The hull is in great shape, and it was epoxy barrier coated, which kept it in better shape. The bad news, is that I sanded half of it off. So I guess that means that I get to epoxy the hull again. I just don't have to put on as many coats.
And the pics; This is where it began.


We had no choice really, the boat had Interlux's Bottomcoat XXX for antifouling paint, and it won't survive life in the tropics. I emailed the company, and they said so. Lucky for me though, the last owner kinda of neglected the bottom paint a little, and the paint came off relatively easy with a sharp paint scraper and a putty knife. It still took several hours over four days to get it done, but it could have been worse. The guy down the end of the parking lot is grinding his off; apparently it was in better condition than mine. So, after all that scraping, I had the wonderful privilege of spending a further several hours over 3 more days sanding off the last remaining little bits of paint, and I thought scraping sucked, turns out that was the fun part.
During the process I came across some weird things in the hull, and having never stripped the paint off of a sailboat hull before, I had no idea what I was looking at. The first thing was that there seemed to be 3 layers of gelcoat. A white layer that was very thin, a grey or translucent layer under the white, that was a little thicker, and finally a thick layer that was the same colour as the hull sides. That should have been my clue, however, since I wasn't told that the boat already had an epoxy barrier, I didn't put two and two together. So I let the cat out of the bag, but basically little things added up, and just to make sure, I shanghaied George and asked him his opinion. He agreed, and pointed out the lines on the bottom of the keel that mimic the shipping cradle, which I had never seen, until now of course. There is another Bayfield down the parking lot that has the original cradle, and then it all made sense.
So, that's great news. The hull is in great shape, and it was epoxy barrier coated, which kept it in better shape. The bad news, is that I sanded half of it off. So I guess that means that I get to epoxy the hull again. I just don't have to put on as many coats.
And the pics; This is where it began.

And after I scrape with paint scraper and putty knife.

And then we sand for hours...

But don't she look pretty.
There are a couple of little holes that need to be filled, and a little hand sanding, but other than that, she is really for epoxy and new bottom paint in the spring. I haven't decided which epoxy system to use, or which bottom paint, but I am leaning toward WEST system epoxy, and Interlux's Micron CSC.
And on; tomorrow I go to Pride Marine in Kingston to pick up my new rigging, heavy duty bow roller, 2 burner stove with oven, and battery boxes for the golf cart batteries that will eventually get installed. Just like Xmas morning.
Thursday, October 13, 2011
Ground Tackle
For the land lubbery, ground tackle is all the stuff you use to keep the boat from moving when you don't want it to. As apposed to sails and an engine which keep you going when the opposite is true. How to make something simple sound more complicated, I'm good at that.
The boat, and we'll call her that until she gets her new name, came with two anchors. A 35 lb CQR on the bow roller, and a 45 lb CQR that was never on the boat, but the last owner had purchased because he thought it might be a good idea. 20 or so feet of two different sizes of chain connected together with 200 ft of braided nylon line that was cut in a few places. Good stuff for a lunch break, but maybe not so good for hanging on in a good blow.
Anchors. Originally I though that a 45 lb CQR was too big for the boat. After all, according to the chart, it should hold a 58 ft boat. However, if it holds a 58 footer, it should hold something half that size twice as well, right! On top of that, I have the anchor, and a new Delta or Rochna would cost $300.00 plus. Versus free, not a hard decision. So, the 45 lb CQR becomes the main anchor, and the 35 lb CQR becomes the secondary. For the stern anchor I wanted a smaller Danforth, I have a 25lb one in the shed, but its too big. Easy to stow, light for its holding power, yadda yadda. Serena and I were getting ready to go to the Port Credit boat show, and knowing that there was a consignment tent there, I had mentioned that all I really wanted was a stern anchor. We were at the show when it opened, and we went to the consignment tent right away to look around. There wasn't much there, but there was a newly painted 14lb Danforth anchor sitting right there on the table for $17.00, perfect. Its in my shed right now, waiting for spring to get mounted.
Chain. I wanted as much chain as I could carry. But chain is very heavy. I ran the numbers, and if I used 1/4" HT, I could get a lot more length for the weight, and it would take up less space, while still having plenty of strength to hold the boat. It was more expensive, but I figured the gains were worth it. I calculated that 130' for the main anchor was about as little as I was going to get away with. That would be good enough to anchor in 20 ft of water with a 5:1 scope. I don't think that I will need to anchor in much deeper water than that, for now, but we'll add 200 ft of 1/2" three strand nylon line to it, to make sure there is lots of length. The secondary also gets 1\4" HT chain, but only 30 feet to help it set, and for some abrasion resistance. The stern anchor is getting a little piece of chain that came with the boat, and I don't even know what it is, but it'll work.
All the remaining rode will be 1\2" three stranded nylon, as mentioned above. The secondary will have an additional 250 ft, and the stern anchor will have 200 ft. On top of that, I will likely carry a further 300 ft in a locker somewhere, if I can find the space.
Windlass. We had no choice really. Both Serena and I have really bad backs. In fact she has 2 herniated discs to deal with, so she would not be hauling in chain by hand. I can do it if I need to, but everyday, perhaps several times a day, not going to happen. Pride marine in Kingston suggested the Lofrans Royal, which is a manual windlass. This was number one on my list, and Dave suggesting it, just reinforced my thoughts. However, I didn't buy it from them because I got a really sweet deal from Binnacle online. $739.00, free shipping. Hard to beat that when the wholesaler's recommended sale price is over $1300.00. I ordered it with the 1\4" HT gypsy. It is a nice piece of gear.
So that's it. Quite a list. But as the saying goes, you can never have too many anchors! Of course that has a limit too. I am of the opinion, as are many others that it is wiser to spend money on ground tackle than insurance, if you had to choose between the two.
See you out there. Rob :-)
Monday, October 10, 2011
The Shake Down Cruise
How much can you learn about a sailboat in 6 days motoring up a river, especially when there is no way to put the sails up(mast down). Tons!! I would bet that Lynn and Larry Pardey would argue with me, however comfort in a sailboat is paramount when attempting a long cruise. Don't get me wrong, sailing is very important too, but if you can't find a comfortable place to sit, or a nice place to lay down and get some rest, or the galley counter top is so low that you need to preheat your back with Robaxacet before cutting up some carrots for dinner, your happy cruise is not going to be very happy. So, as much about a little relax time as anything else, we headed up the Trent River for 3 days, and then spent 3 days coming back. We wanted to live on the boat, and perform basic functions like cooking, sleeping, going to the bathroom, brushing our teeth, and engaging in other extra circular activities that make for a healthy and happy adult relationship, like eating and drinking beer...
So we came up with the list. A whole list of things that we had to change before we move aboard. I'll try and remember most of them. I have the list around here somewhere.
1. Change the head. Our head is a Jabsco, and it hates us. Just when you think you have the trick figured out, it changes how it wants to be used. Also, I tried every kind of lubricant known to man, and I couldn't get the pump to stop squealing. Lavac, here I come. I have to re-plumb it with a Y-valve anyway so that when we are in the middle of nowhere, we are not trapped with our feces.
1. Change the head. Our head is a Jabsco, and it hates us. Just when you think you have the trick figured out, it changes how it wants to be used. Also, I tried every kind of lubricant known to man, and I couldn't get the pump to stop squealing. Lavac, here I come. I have to re-plumb it with a Y-valve anyway so that when we are in the middle of nowhere, we are not trapped with our feces.
2. Change the settees. They are uncomfortable as hell. I need to modify them so that they are as comfortable to sit on as a couch, and still make good beds.
3. Re-plumb the water. Our pressure water comes from our two 40 gallon tanks, but pressure water eats up the fresh water too quickly. So, I decided to put outside water through the pressure system, and install manual pumps for the fresh.
4. The Galley countertop is too low, and too hard on the back. We are going to gut the galley, raise it 4 inches, install a larger sink, a stove with an oven, and a custom built refrigerator to keep the beer cold.
5. Need seating in the cockpit. Again, looking for couch like comfort, plus a couple of folding plastic seats with backs for near the helm, that way we can see over the cabin roof without standing up, and we are not in the way of the main sheet traveler, which likes to throw me on the floor every once in awhile.
6. TV. We need tv. Okay, we want TV, semantics. For rainy days, news and weather.
7. A shower. There is a grate in the bathroom, and some room under the floor for a tank. We will use a modified garden sprayer for pressure, and heat water on the stove, but it is better than nothing.
8. Fans, we need cabin fans, if only to get the smell of my socks out of the boat as quick as possible. Or most likely to keep us from boiling in our own sweat on those hottest of hot days.
Wow, I thought there was more than that, but since I can't seem to find that damn list, that was all that comes to mind. There are a pile of other upgrades and new equipment as well, but I'll talk about them later, as I get around to it. But they include a complete new system for ground tackle, new sails, new rigging, new bottom(epoxy barrier coat and bottom paint), rewire the entire boat, solar panels and charging system, new electronics, dinghy modification, and even more stuff. I don't know how I am going to get it all done before the end of May next year, but at least I don't have a pesky job to get in the way. So, I look at the title of the blog, and I am trying to figure out how this simplicity thing is supposed to work again. Because this list doesn't seem so simple. However, in our defense, we are not adding a lot of things to the boat that others say we can't live without, like Single Side Band radio, or radar, or ..... Well I am sure there are other things. The boat will be complex, but probably a little simpler than most. We are getting older, and discomfort becomes more and more difficult to live with, with age. If we were in our twenties, we would have bought the Alberg 30, and headed south this year. Or maybe a bathtub..
Rob
Sunday, October 9, 2011
Meet Adios
I have been dreaming of sailing, or more importantly sailboat cruising for a long time. I was in my tweens when my neighbor and good friend Micheal enlighten me with his dream to cruise the oceans on a sailboat. Sadly, for him sailing was not the life he had hoped it would be, and he found his love in other venues, however, I was captivated by the idea and carry on the dream he started to this day. Since then cruising has been a bucket list item, but not until I was nearing my 20 year mark in the military did it start to take on renewed importance.
I had had my sights set on the Alberg 30. An Ontario, Canadian built little sloop that had proven its ability to sail around the world more than once, had a good reputation, and a huge following. Perhaps setting my heart on a boat that I had never actually been aboard may seem a little foolish, especially now, but I digress. So one evening while hiding from the mosquitoes in our screened in porch, Serena and I were solving the problems of the world over a few beers, and I said to her, "lets get a boat and go south next winter". And the rest is history. She may eventually live to regret that alcohol induce decision, but it was too late, I had the go ahead. So we went looking for a boat that we could buy and outfit for 30k (ha ha ha), yeah, its funny now. We looked at several that were on the list, but they just didn't fit the bill. We even looked at a fully ready to cruise Alberg 30, that would have cost us in the neighborhood of 24k, but alas, the boat was just a little too tiny for Serena, and truth be told, I was a little surprised by the size as well. I would have gone south in it, hell, I would go south in a bathtub if that's all I could get my hands on. After all, what's adventure without some good ol' adventurous discomfort.
Meet Adios. In the same Yacht Club as the Alberg was a Bayfield 29 for sale. I like the Bayfields, but they are not really known as offshore boats. And although I may never take the boat on a real passage, to say Europe, I wanted the ability to do so. However, for a trip south to the Carribean, the Bayfield was a near perfect boat. Shallow draft, roomy for a 29 footer, diesel engine, and most importantly, still small enough that either one of us could handle her alone. So we called the owner, and within a couple of weeks, we were the proud new owner of one 1983 Bayfield 29 named Adios. Unfortunately she would sit in the slip at the Yacht Club for the entire summer, as we were building a house, and had no time for a boat. Serena says that is my most endearing quality, purchasing expensive items for a life I don't yet have(hmmm).
So here she is. She is currently undergoing a name change, and until we get the go ahead from Transport Canada, even that is up in the air.

Isn't she a beaut. Very classic looking. We have only had her out for one little 6 day trip up the Trent River system(mast down), but she never failed to get oohs and ahhs from passers by. I can't wait until this is what I call home.
I am obviously way behind in this blog, having started it in Oct, where as the boat was purchased in Jun, however, better late than never. Most of my posts will be like that, as I slowly get my thoughts in writing. Besides that, you don't want to know about the research and development process before the decision is made on changes, trust me, you don't have that much time to read, and I don't have that kind of time to write, retired or not. Until next time.....
Subscribe to:
Posts (Atom)