Lift Out was yesterday, including the commute it was a 13 hour marathon. Only one crane showed up, and most of the boats came out. With low water levels and the usual, (how the hell did that fit last year), we struggled thru. Serena did good, she kept going all day and didn't even stop for lunch, her back was tender last night, and she won't be moving much today, I guarantee it. My knees felt like they were going to explode most of the day, but I tried my best to keep involved as much as I could, and keep a smile.
The bad news is that the boat didn't fit on the cradle how I had hoped. It will work for this year, but it needs more consideration. I think I am going to have to cut and re-weld the front supports. I am not sure if I want to attempt it while the boat is on the cradle, plus I don't think there is enough power available down there to run the welder.
On top of that, we didn't get it centered properly, and the boat is listing to the port side. I need to try and get it straightened out so I can work on it. Monday... I am pretty confident that I can get her all leveled up.
Today I think I'll tinker in the shop, maybe take it easy. Walking is a little more difficult than usual today.
Cheers.
Sunday, September 30, 2012
Friday, September 28, 2012
Nav Station/Port Quarter Berth
Yesterday ended up being a flop. I had grand plans, but only managed to get the Nav Station table cut and clean up the hatch molds for the cockpit lockers. Then we got a phone call from the Realtor, and she wants to show the house this morning. Having been working in the shop for a week, it was wrecked, so I spent until 8:00 last night cleaning, and no painting of course, to keep down the fumes. I did however get all my tools loaded back into the truck for next week. Today will also be a write off, with the house showing and family visiting later. If the house sells, we're screwed, we'll never get everything built before we lose the shop. But don't tell Serena. No seriously, it'll get done, but I might not get much sleep in the process.
Anyway, I finished the port quarterberth and the battery boxes a couple of weeks ago, but I never got around to posting the info, so that is today's quest.
 First I wanted to show the fuse holders for the battery connections. Fuses are designed to protect wires, and to do so efficiently, they need to be at the beginning of the connection from the source to the wire. You can buy special connectors to do just this, but they are expensive. So I made my own. I used some discarded fiberglass from gutting the boat and ground them down with a diamond blade in a 4" angle grinder to fit the shape of the 100Amp fuses. I'll zip-tie a small piece of rubber to the wire that will provide some measure of protection in case fumble fingers drops a screw driver. There's nothing wrong with talking about yourself in the third person, just answering yourself, right?
 Then I built a box to fit the 3 house batteries, with some wiggle room. The box fits the existing locker, and then there is a frame at the bottom of the box that fits the batteries. I epoxied the seams, and strengthened all the parts with epoxy. After all, this is a lot of weight. Then I added a removable 1/2" copper water pipe down the middle to make sure they never get out of the box to play on their own. Can you imagine the damage these things could do if they were lose in rough seas, or God forbid, a knockdown. Ouch, 80 lb cannon balls full of acid.
 Here is how the box fits in the space. There is a frame underneath that supports the box, but it is glassed into the liner as apposed to the hull. That way it doesn't interfere with the hull flexing, and won't break apart because of it. I also added some additional bulkheads to breakup the space a little, made a template and cut the top in two pieces, then cut out all of the hatches. The starter battery goes in the last hatch, and gets strapped into the back end of the battery box. I had to build a special base for it, and screwed it to the bottom of the commercial battery box instead of attaching it to the hull. Facilitates easier maintenance and removal.
 Notice below that the bulkhead is glassed into the hull, however, there is a 1/2 piece of foam between the bulkhead and the hull, and I only used 1 layer of glass to cover the joint. It is not intended to be structural, I just wanted to make sure it didn't move around. This particular piece could fall right out and not effect the integrity of the hull, or the battery compartment for that matter.
 And here is what the finished product looks like. I still need to paint everything, and add some strategically placed vents. I may also add some latches to the locker hatches to make sure that they don't fly across the cabin in rough seas. More than likely though, there will be so much stuff crammed in here that it would take an act of God for them to get out. This can still be used as a berth, since I only raised the deck by 2 1/4".
Its hard to tell in the picture, but the top is glassed to the liner as well. I glassed a cedar 3/4" x 3/4" stringer to the hull at the height of the deck, and rested the deck on it. There are a couple of screws, but basically they are not attached, and there is a 1/2" space between the top and the hull. Then the top is screwed to all the other bulkheads, dividers, etc.. The theory again, being that it does not interfere with the hull.
 I will mount a folding boat seat to the battery box lid, and add a cabinet under the current shelf at the top of the picture. Overall this project was probably worth it. There was a gentleman on the news group who managed to squeeze four batteries in the original space, so this wasn't really necessary, however, I got a lot more usable storage space just by adding better access, and on a cruising boat, storage is good.
Anyway, I finished the port quarterberth and the battery boxes a couple of weeks ago, but I never got around to posting the info, so that is today's quest.


Its hard to tell in the picture, but the top is glassed to the liner as well. I glassed a cedar 3/4" x 3/4" stringer to the hull at the height of the deck, and rested the deck on it. There are a couple of screws, but basically they are not attached, and there is a 1/2" space between the top and the hull. Then the top is screwed to all the other bulkheads, dividers, etc.. The theory again, being that it does not interfere with the hull.

Wednesday, September 26, 2012
T-Minus 3 Days Till Lift-Out
A depressing time of year usually, but for us, it is also a good time. It means we can work on the things that can't be done with the boat in the water, and things that are just easier to do when its out.
We have decided to replace all of the seacocks. They are 30 year old gate valves, and although they work fine, they are not the type that bolts through the hull, they are just the screw on type. Failure of one of these could sink the boat very easily, so for the sake of a couple days work, and a few hundred dollars, it makes sense in my book. We are also going to raise the waterline 4" on spec. We had originally hoped to have the boat loaded for cruising to determine where the new waterline should be, but as fate would have it, we'll just have to make an educated guess. Then there is finishing all of the exterior wood, which Serena has graciously offered to help with. Nice to have both of us working on the boat for a change. The transmission needs to come out and be sent to Toronto for rebuild. We noticed last year that when it warms up it tends to slip when first engaging from neutral. Which, according to the gurus, is because the cone that engages the drive has gotten a little too shinny and lost its traction.
Yesterday we delivered the cradle to the boat. Took the girl over to the pump out to empty the holding tank. Removed the temporary 110V electrical panel, so that it could be put into the new panel, and removed the big yellow umbilical cord that provided the dock juice. The rest of the day was shopping. I was going to paint, but we had to show the house this morning, and I didn't think the lady would be too happy about the smell of 2-part polyurethane paint.
Today was good. I finished the electrical panel, and got the first coat of cetol on it. Made the molds for the cockpit locker lids, and spent an hour practicing the guitar. We all need a hobby... Tonight is painting, staining, and fibreglassing different things at different stages, and the polyurethane paint is about to go off in about 5 minutes, so I better get back to it. Pictures tomorrow, of something I'm sure....
Monday, September 24, 2012
New Cradle Mods/Project Update
Shop talk, or work, or play, depending on who is looking at it, and how frustrated I get while doing it. Yesterday was a play day, mostly..
Finished the cradle. The cradle that came with the boat was not appropriately sized for the boat, it worked, but barely. Trying to finish the bottom was impossible, because the legs were not adjustable, so no way to paint under the pads. Plus they were positioned on the waterline, promoting osmosis blistering.

Since I was planning to strip, epoxy, and paint the bottom, I needed access, and cut out the legs, fashioning new adjustable legs. A jury rig, but effective, considering the boat was sitting on the cradle when I did it.
 That solved some of the problems for last year. After the boat was put in the water, I cut the cradle into pieces. The theory being to make the cradle portable, and make it a little narrower. Brought it home, and let it sit there. With the boat coming out of the water in a week, I figured I had better finish it up.
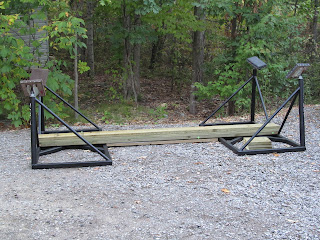 And here it is. I cut the corner pieces out of the old cradle and bolted them together, changing the width from 9 feet to 6 feet, to get the support pads back under the boat where they should be. Shortened the length from 12 feet to 11 feet, to keep the pads away from the knot log and depth sounder transducers.
 But the most notable change is that there are now effectively two cradles, one for the front, and one for the back. That makes the cradle much more portable. In fact, I can move it around and load it in the truck myself.
There is a little concern that the pads will be too high. I knew it was going to be tight but they are as low as they can go. To make sure they would fit, I put 3 - 2 x 10 planks along the centerline to support the keel, and lift it 4 1/2 inches above the cradle. I'll know more after this lift out. But with any luck they won't be needed next winter.
The rest of the day I worked on the electrical panel. I was having a hard time figuring out where to put the electrical panel on the boat. I was going to put it in the existing shelves beside the Nav Station, but I didn't want to ruin the shelf just for that, besides, I like the smoked plexiglass sliders. So I was trying to figure out a way to put it below that shelf with its own sliding cover.
As luck would have it, I realized when I was designing the 110v panel that there was enough room on the panel for all of the circuits. I had moved the 110v input plug from the cockpit to the side of the coach house by the Nav station. It was a bit unsightly, so I planned to put a little cupboard over it that would provide a little storage too. Then I thought it might be a good spot to put the 110v breaker.
 Above is the cardboard mock up in the boat. Notice the VHF radio also, I installed that last week. Originally I wanted it and the stereo in the electrical/electronic/nav station panel, but decided it would be better placed as close to the companionway. Its fairly water resistant, but the stereo is not, so the stereo couldn't join it. I'll find somewhere else to put it. The electrical panel is 4" deep, roughly 20"x15". But after making this template, I realized that it could house all the electrical controls.
And below is the preliminary panel.
 I took the switch panels apart, sanded the writing off of them, and painted them gloss black. These were the cheap breaker/switch panels that can be picked up at any marine chandlery. I'll label them as I use them. I don't like the Blue Sea breaker panels. Coming from an electronic/electrical background, breakers were for protection, and switches were for turning things on and off, and a neither should be used to do the others job. So the one set of breakers on the far side, I left for future use, just in case. On the first two panels I cut the breaker side of the panel right off and tossed it away before I painted. I will use fuse panels with automotive blade-type fuses to protect my circuits, the way they are supposed to protected. Most people don't realize that fuses/breakers are designed to protect the wire, not the equipment. Also, when a breaker/fuse goes, there is a problem that needs to be fixed, and switch type breakers make it too easy just reset them and carry on. My rant for the day, sorry.... Ironically, I used a Blue Sea breaker panel for the 110v system, but I don't intend to use it as a switch. I'll report more on the panel later when it gets installed and I start wiring.
That's all for today. Tomorrow we have to go set up the cradle, pull the temporary 110v breaker out of the boat so I can mount it in the panel, and go shopping, apparently we need food in the house, and I could use some new slippers.
Cheers.
Finished the cradle. The cradle that came with the boat was not appropriately sized for the boat, it worked, but barely. Trying to finish the bottom was impossible, because the legs were not adjustable, so no way to paint under the pads. Plus they were positioned on the waterline, promoting osmosis blistering.

Since I was planning to strip, epoxy, and paint the bottom, I needed access, and cut out the legs, fashioning new adjustable legs. A jury rig, but effective, considering the boat was sitting on the cradle when I did it.


There is a little concern that the pads will be too high. I knew it was going to be tight but they are as low as they can go. To make sure they would fit, I put 3 - 2 x 10 planks along the centerline to support the keel, and lift it 4 1/2 inches above the cradle. I'll know more after this lift out. But with any luck they won't be needed next winter.
The rest of the day I worked on the electrical panel. I was having a hard time figuring out where to put the electrical panel on the boat. I was going to put it in the existing shelves beside the Nav Station, but I didn't want to ruin the shelf just for that, besides, I like the smoked plexiglass sliders. So I was trying to figure out a way to put it below that shelf with its own sliding cover.
As luck would have it, I realized when I was designing the 110v panel that there was enough room on the panel for all of the circuits. I had moved the 110v input plug from the cockpit to the side of the coach house by the Nav station. It was a bit unsightly, so I planned to put a little cupboard over it that would provide a little storage too. Then I thought it might be a good spot to put the 110v breaker.

And below is the preliminary panel.

That's all for today. Tomorrow we have to go set up the cradle, pull the temporary 110v breaker out of the boat so I can mount it in the panel, and go shopping, apparently we need food in the house, and I could use some new slippers.
Cheers.
Sunday, September 23, 2012
Couch Comfort
Okay, the single best improvement I've made so far. The
couch….
Anyone familiar with boats can tell you that manufacturers
don’t exactly put a lot of effort into creating comfortable seating down below.
And Bayfield owners do not escape this unfortunate problem. Some of it is due
to compromises, lets face it, how do you make a seat that makes a good bed, a
good sea berth, a comfortable upright position for sitting at the table, and a
lounging position for relaxing. You can’t… Well, maybe some kind of lazy-boy,
but then how do you put something that big in a little boat.
On our Bayfield 29, the seats(settees on a boat), were
shallow front to back, and had a steep back on them. Fine for eating dinner at
the table, but very uncomfortable for sitting any longer than that. Then, the
back swings up on hinges and locks in the upward position providing a wider
area for sleeping, all the way to the hull. Large beds (berths on a boat),
indeed, but really wasted space.
As we are going to be living on board, with both of us
having back issues, and the potential to be stuck down below for longer than
the dinner hour, we needed somewhere comfortable to lounge. On the
Bayfield 29, the seats are also used as beds, so that needed to be taken in
consideration.
The finish product was a 25” berth, a 21” couch, properly
sloped back, a comfortable place to sit, and a great place to sleep, as I found
out last night. In fact, I am sitting on it right now while I write this in
complete comfort, drinking my morning coffee.
Procedure:
- Remove and discard the lift up back.
- Cut the 2” lip off of the shelf that extends out to allow the back of the seat to be lifted up.
- Spend a inordinate amount of time trying to figure the most comfortable angle for the back cushion, allow enough space for the bed, and work within the confines of the existing space. I mentioned compromise earlier, right!
- Once I had it all figured out, I made the new back and installed that, complete with large openings for stuffing things behind. Never enough storage on a boat.
- Extended the base of the couch as far as the existing cabinetry in the boat would let me.
- Cut cushions from existing cushions, since we went from 4 beds to 2 during this refit.
- Covered them with our new upholstery fabric, (that we got for $5 a yard, sweet).
- And tada….. only 20 hours of work or so.
But man is it comfortable. I don’t imagine it will make a
good place to sit at the table, at least not without lots of cushions behind. I
am not yet done trimming it out, staining,
making covers for the storage access ports, or installing lee cloths.
But that’ll come in time. For now I am just going to enjoy the small little
success.


The cushion covers look a little loose. The foam was not the right size for the berth, close, but not perfect, so I made the cushions covers to fit the seat, in case I replace the foam. After all, they are 30 years old. Plus, I had intended to cover the cushions in a layer of quilt batting to increase the comfort of the seats, but I like it just the way it is. Of course there is the irritating fact that the fabric, although nice, is a bitch to sew. The top is a little fuzzy, so it slips in the machine, where the weaved back does not. I tried everything on my machine but could not compensate for the slippage. I guess I'll just have to keep that in mind when I do the rest of the cushions.
By the way I started sleeping with the back cushions in
place, last night, and although it would do in a pinch, taking them
off and gaining the extra 4” was invaluable. Mind you I am rather large guy,
6’1”, 230 lbs, so I need a little more space than some. For a proper sea berth,
the experts call for 22”, so the 21” with the back cushions would probably be
better for most folks, but now we have the option, and can quickly change it
depending on which crew member is off watch.
TTFN
Saturday, September 22, 2012
Progress; They Call It.
Wow, I am so far behind on the blog, it isn’t funny. No, its
not funny, its giddy, because so much work is getting done on the boat.
Finally, making some serious progress. The next few posts will jump around a
little, because to be honest, I don’t remember the time line in which it all
happened. Must be old’timers setting in.
However, here is a rather brief synopsis of everything that
happen in the last three weeks.
We went sailing. Woo Hoo….. Yes, it’s the only time we got
out sailing this year. My son wanted to go out on the boat with his girlfriend,
her never having been on a sailboat before. So we went out for a couple of
hours and tooled around the bay. We were rusty at first, me with my commands,
and the crew with their understanding of what was going on. Okay, fine, it was
all my fault, and I said I was sorry. Why is it that the captain is always
responsible for everything that goes wrong, and the admiral always takes credit
for everything that goes right. Me thinks me gett’d ripped off in this deal.
I have been spending a lot of time at the boat. Living on it
for 2 or 3 days a time, putting as much effort as I can muster into getting
through the projects. If I don’t get this refit done, Serena is going to kill
me, or force me to kill her, I am not sure which, but neither of them seems
like a successful outcome, for either of us. The rest of the time I am taking
care of domestic chores, (shopping), or working in the shop.
I finally finished the fridge box. In fact Thursday morning
I put a coat of 2 part polyurethane pant on it before I left for the boat. I’ll
cover the specifics in a later post, but hopefully it will be going in the boat
soon. I have to add all the insulation while it is in the boat, because it
won’t fit through the companionway otherwise.
I finished the couch, so now I have a comfy bed and a great
place to sit and relax. A comfortable place to lounge is worth its wait in
gold, especially for those of us who have broken some of our parts over the
years.

The battery boxes are glassed into the hull and there is a
new top on the port side quarter berth. Now I can design and install all the
electrical panels and controls. Finish the nav table and associated cabinets.

Made a new screen for the forward hatch. The original had a
broken frame, so I made a new one out of ½” marine ply and a supper fine heavy
duty nylon screen. Although I noticed last night that the screen was pulling
out of the one side, so I will have to put some adhesive in there to keep it in
place.

Replaced the screens and all the rubber seals on the all the
opening ports. I was a little apprehensive about doing it, with the cost
of parts somewhere around $500.00. But, it was a complete success, if a pain in
the butt to get it done. I had to tape the seals in place while I got the
rubber placed in the groove, but the manufacturer warned me not put tape on the
rubber as it would peel off the first layer. So I put a piece of 1”
masking tape across a 2” piece of masking tape creating a 1” strip with no
sticky part, and used that to hold rubber in place while I set and closed the
port. Okay, I used lots of those pieces of tape, dozens, and had to make it
wider on the corners. The forward hatch had to be completely covered with none
sticky tape because there was so much pressure on the seal when the hatch was
closed that the siliprene glue was squeezing out.

The propane lockers are finished, except for paint, and
dropped into the afterdeck of the cockpit. I am going to finish all the cockpit
glass work after the boat comes out next weekend, do it all at once, that way I
am using the same batches of gelcoat and not 6 different color variations.

And cleaned the boat. Oh boy did I clean the boat. Inside,
and out. Although, you wouldn’t know that the outside every got touched. The
inside is still pretty good, and I try to keep it cleaned while I work, after
all, I have to live here too.
On to the next project….
Sunday, September 2, 2012
Back At Er...
Kid in a candy store.
Tuesday last week we put our house up for sale. We had originally planned to keep it and cruise, while our son looked after it, however, due to the nature of the house, and the nature of 19 yr old boys, we figured that we would be better off selling it. What that really means though, is that the house is done, and all my focus can be put toward the boat.
So, Wednesday I went down to the boat to give her a good cleaning, spend the night, look over everything and fall in love with the project again. It is amazing how overwhelming a project of this magnitude can get when there is no consistency to the plan. So this was a re-evaluation as much as anything else.
I started writing a list of everything that needed to be done, but after three pages I needed to give that a break. I figure the list is about half done, if I am lucky.
Things progressed slowly on Thursday and Friday, just trying to find the motivation. By Saturday I had it back. Built the new battery box, worked some more on the fridge box, finished the propane lockers with temporary tops. After I install them I'll design the real lids, but they will be built with a female mold I'll build.
I recharged all of my batteries. The Trojans I bought for house batteries were almost dead, but they were sitting in the garage since January. Note to self, don't do that again....
Anyway, there are so many little projects going on right now that it is hard to discuss just one. I'll try and finish something and then put the process on here.
Cheers for now.
Subscribe to:
Posts (Atom)