We've Moved

HEY EVERYBODY, WE'VE MOVED

Our blog had gotten too large, and it was getting to the point where it was difficult to comb through looking for specific posts or information. So we have developed a new blog at SailingVita.ca Come and see whats happening now.

Wednesday, February 29, 2012

Vita has a new Staysail

Do blogs have limits for the number of pictures? I hope not. Because if they do, this post will be over it for sure.

I finished the staysail today. I didn't keep track, but I figure somewhere around 30 hours to complete. About 3 times faster than I had originally thought before I started all this. Of course, having never sewn a sail before, I didn't have a valid frame of reference. It was however, a blast. I really enjoyed it, and I am hoping to start the mainsail tomorrow. I think I will try and keep track of the number of hours I it takes me. The only real problem is that I am now a seasoned sailmaker, and it will not be a true example of how long it takes for a rank amateur to complete a project of this type. Oh well, I'm over it....
A few posts back I wrote about making my new sewing palms. Emilian Marino in his book said that you needed two palms. A seaming palm and a roping palm, but to be honest, I really didn't see the need for the roping palm; until now. I was using the seaming palm to do the hand sewing, but my hand was getting sore pulling on the wax twine. Then I remembered that the roping palm had the added piece on the thumb to provide support for putting some good pressure on the twine. It took a bit, but totally by accident I started using it the way it is supposed to be used, (I think), and I got through the whole sail without and pain in my hand. So, I change my previous statement of, "you can't sew a sail without a palm", to, "someone would be insane to try and sew a sail without a roping palm."
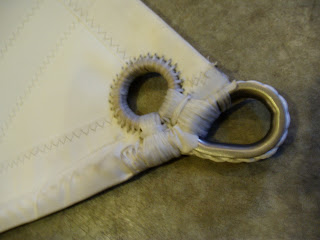
 Here is a picture of reefing grommet on the luff. There was nothing in the instructions about adding chafe protection for the reefing grommets, and I didn't think of it until after I had installed the two on the luff. Luckily, the luff has the least amount of chafe. It is attached with a large shackle, and it doesn't move around much. Mind you I couldn't leave it like this, so I had to come up with something.
 Here is the leather rapped tack. 
 This is what the head looked like before the leather chafe protection covered it up.
 This is one of the two leech reef points. These ones are subject to a lot of bashing around. Stays, shrouds, stuff on deck, life lines, etc.... Its always moving around, so it needs some good chafe protection. I got the idea for this one out of Emiliano's book. He recommended covering the whole grommet with leather prior to putting the thimble in, but there wasn't enough room for the thimble. So I had to go half way with the leather, and then put a second piece on the backside, over-top. It should work nicely.
 The head after being rapped with leather.
 My answer for the luff reef points. The leather protects the edge of the sail, and boltrope. There isn't a lot of chafe problems here, as mentioned before, but this will take care of the sensitive areas, and I didn't have to cut out the thimble and do it all over again.
And the clew attachment, finished. There are three separate pieces of leather on this to protect the stitching. The directions didn't call for it, but Emiliano's book recommended this setup. It made sense to me, so I went ahead and did it. There was lots of extra leather, so what the hey...
 Crappy picture, but the spur gromments were installed  as the directions indicated, and the snaps were put into place. There was no chafe protection for the snaps, like the usual little pieces of plastic, but these are easy to remove, and if I notice any chafe, I'll have to put something in between the snaps and the boltrope.
 I couldn't get a picture of the whole sail, so here are a collection of shots showing the finished sail.


And lastly the Sailrite logo. Its a sick on, and it is supposed to stay put. In the videos on their website they always sew them on as well, maybe I will later, who knows.

All done. One of the gentlemen in my yacht club warned me about attempting to make my own sails, saying that I had better leave it to the experts. Kind of like mortals messing about in the world of the gods. But I have to say, this was really quite easy, especially considering it was my first time. I will admit though, that if I had to design the sail, and cut out all the panels, it would have taken a lot longer, and the results would not have been anywhere near as good.

The true test of course will be out in the big tank. Now if this wintry stuff will go away so the boat can go in the water, and the mast up, we can try out this new sail.

Fair winds...

Monday, February 27, 2012

Staysail Continued... Part II

Its been a good day. I didn't spend a whole lot of time on the sail, but I accomplished some big milestones. I finished the foot and the leech tapes, installed the boltrope, including the eyelets on either end and the first of 7 sewn in rings in the tack.
 The sewn in tack, spliced around the thimble and hand sewn to the sail.
 And this is the head eyelet. notice the boltrope sewn tight against the edge of the sail. As recommended, I used a zipper foot, and moved the needle over as far as it would go in order to get the rope in tight. The neat thing though, is that it was the last stitch the machine will make on this sail, (except adding the logo), and it really made the big lump of material actually look like a sail. Its really cool.
And here is the first brass ring sewn in and sewn to the eyelet. The brass ring gets 2 rows of stitching around the outside, an inner and outer, to really distribute the load. The only thing left for this corner is to add the leather patch over the stitching to prevent chafe.

I am really starting to get into this. Its a lot of fun. In fact, I am beginning to think I missed my calling. If I wasn't retired I would seriously be think of becoming a Sailmaker, or maybe canvas worker. I guess I'll just have to do it for friends, and they can thank me with beer, of course.

Till next time....


Sunday, February 26, 2012

Staysail Continued...

Good day. I managed to complete all of the patches. The second set of reef (clew and tack), and all the corner patches. I also got the rest of the panels sewn together. Its starting to look like a sail. The last thing I got done was the leech tape with the leech line and the 3 sets of cam cleats for adjusting it. I am getting much better at it, as I go, but it is still a pain in the behind. In fact, my ass is killing me from sitting on the cold hard concrete all day working on it. I have given my back a little break now by doing as much work in a standing position as I can, like basting the patches together.
When I install the leech tape and the leech line I was sewing through 8 layers of 7.4 oz Dacron and the 1/8" line, at the head of the sail. About 1/2" thick.  It was tough, but after a few broken threads and a broken #19 needle, I finally managed to get the 4 inches done with a #20 needle and doing all the back-stitching by hand. It wasn't that the machine wouldn't do the work, it was fine, but the action was a little rough on the needle and thread.
All done the reef patches. The sail is 138 sq ft, the first reef knocks it down to 102 sq ft, and the second reef brings it down to a measly 52 sq ft, about the size of a respectable storm sail, can't wait to see how it performs in a blow. 
 Finished clew reinforcement patches; so much easier than trying to sew one in the middle of the sail.
 Finished tack reinforcement patches.
Finished head reinforcement patches.
Not a very good picture. But I modified the cam cleat setup from the directions, and went with the style that I saw in the Sailrite videos on their website. It just looked a little better finished. The directions wanted me to cut holes in the leech tape to run the leech line through, and then sew webbing over them to protect the holes. The way I did it, I just put two different pieces of leech tape and overlapped them allowing the line to come out between the two, then back in at the next overlap 10 inches away. A cleaner look in my opinion.
See, I said it was starting to look like a sail. Tomorrow the foot, the luff, and start on the hand work, grommets, etc... This is a lot more fun than I thought it would be. Its cool to think that these hunks of fabric may one day carry me thousands of miles, and they were put together by me in my little garage in the woods.

Later...

Saturday, February 25, 2012

Making Sails

Okay, 2 days in, and I am beginning to wonder if buying the sails wouldn't have been a better idea. I did save a few pennies, and its a great experience, but holy crap.... its hard work.

I had originally cleared out my shop and set up a 4' x 8' table, which was fine for sewing curtains and little stuff, I even used it to tie over 120 hair jigs for fishing, but for sewing sails, it was totally useless. So, I had to rip that apart and get as big a space as possible to lay the sail out on the floor. I even had to let it run through the door into the office, and still had to move the machine back a few feet in order to sew the first seam just over 13'.

As this was my first attempt at making a sail, I decided to start on the staysail. I figured the main was a little more critical, so I would practice up on the least critical sail first. I watched the videos from Sailrite, and read over the instructions several times, then dove in. This sail was designed with 2 sets of reef points, that way I can reef it down to storm jib size. I also had the kit made with 7.4 oz dacron to make sure it was strong enough, and just so it was that much more difficult to handle through a sewing machine. Yeeeah.

First step, make sure everything is there; check! Then cut out the 14 - 4" square pieces to make the intermediate reef points. From Scrap material provided with the kit. They gave me enough extra material that I could almost make another sail, it was a big piece. Can you say spares kit!!!

Then baste the little patches together, two layers thick, and to the sail on the factory indicated spots. Roll up the sail for access and sew. Put a hole in the center and install a spur grommet. Ta Da, not magic, but felt good anyway.
Next I sewed the panels together. Basting them with double sided tape provided with the kit, and put 3 rows of stitches down the 1" seam. I asked for the sail to be designed for triple stitched seams for strength. Notice in the picture that the panels don't line up really well, that's because they curve the seams to impart the draft in the sail. A neat concept, but a pain in the ass to sew, or roll, or deal with in anyway. Also knee pads.... life savor.
I put together the first 3 panels, as the next step is to put on the leech and luff reef patches. Lucky for me they over lap the panel seams, so I get to try and put them in after the panels are together, so there is twice as much material to work around. And who says sarcasm is dead.
 Triple Stitched Seam
 First Reef Luff Patch
 First Reef Leech Patch
The luff patch is 5 layers plus the panel, and the leech patch is 6 layers plus the panel. You would think that would be hard for any sewing machine to get through, but the LSZ-1 just motors right along like it was sewing some light canvas. Just awesome.... Trying to maneuver that thick patch around the machine was fun, especially attached to the sail. I ended up moving the machine around instead, whenever there was a direction change. On my hands and knees, running the machine pedal with my right hand, and feeding the fabric with my left hand, because with so much weight, the machine was having a hard time moving the fabric through and keeping the 3/16" x 3/16" size stitch that is recommended. If I had of had another hand or two, now that would have made things easier. But alas, I am only a poor two handed human.

Sew, (pun intended), its coming, with a lot more to go. I am looking forward to the finishing parts. I don't know why, masochism perhaps, but I like the hand work better (no pun intended, you sick #$%^#%).

I'll probably have a few more posts over the next couple of weeks as I try and finish up these two sails. I can't believe that the sailing season is just around the corner. I got my membership paperwork today, for the yacht club, and the first work party is scheduled for the end of march, 5 weeks away. Woo Hoo.....

Until next time....

Sewing, sewing, sewing, and some more sewing

Its been awhile since I made an entry. Not that I haven't been busy, but I haven't spent a lot of time on boat specific stuff. I did finally come up with a final design for the electrical, together with some help from the Bayfield Owners group, Nigel Calder's "Boat Owners Electrical and Mechanical, and a couple hundred hours of internet research. It would be very difficult to put the design up here on the Blog, but I will detail it during the installation, in the next few months. The same goes for the refrigerator, I've got it designed, just need to implement.

So, the curtains for the house are finally all made, and I also put together a maple leaf quilt with the left over material, for the back of the couch. Made a cover for my Kobo (E-Reader). Then I made a dity bag according to Emiliano's "Sailmakers Apprentice", a doubled walled canvas bucket based on the same design, an 11" high bucket, and a drawstring backpack. The point was to get comfortable with sewing again, before tackling the sails. Turns out, a really good idea.


So, now it is on to sails, and I have actually started them, but I'll make another Blog entry for that.

On another note. I am starting to realize that my list of things to do is going to take more time than I have right now. I guess its good that we aren't leaving for another year, that gives me the fall and the following spring to get everything finished up. However, because of my electrical design, I have to make a hard dodger to mount the solar panels on, which means the cockpit add-a-room will have to modified. Add it to the list....

Onto sails....